PC 2021: Work vs Play

Last year I upgraded my personal PC and enjoyed my first PC build experience, my old PC went to the kids.

A year on, things have pivoted. The kids PC was struggling to run some modern games so I took a look at upgrade options. Considering current graphics card pricing, rather than building two PCs that were capable of gaming the plan was to optimize one PC for gaming and one for working. We share the gaming PC and the work PC can be switched off at the end of the day…

Work

The work PC needs to be fast, quiet and reliable. It doesn’t need a ballin’ graphics card and it doesn’t need to look like a unicorn dance party. Much of last years build is better suited to the gaming PC so the work machine took the existing CPU, memory and storage. The machine is very conservative: a black Be Quiet! 601 case with a Noctua NH-D15 air cooler for the Ryzen 3900X – no lighting effects, no water cooling, no glass panels on the case but lots of sound proofing. The new motherboard is a solid X570 board but no frills: no Wifi, no bluetooth. I had a GT 1030 graphics card lying around so that went in to drive the displays, it’s powered directly through the PCI slot, very quiet and runs cool. Not being able to run games is one less distraction…

A big change in the last 12 months is that Windows 11 / Server 2022 now supports nested CPU virtualization on AMD processors. This has allowed my work PC to be rebuilt as a Hyper-V host with virtual machines running various combinations of OS and dev tools which can now run containers. The RAM needed to support these VMs has meant that the motherboard is maxed out with 128GB. The only gotcha as been Windows Server not supporting the on-board Intel I211 NIC, however there’s a work around. Installing the Intel I218-LM driver makes Windows Server happy and all is well.

There’s a pair of Dell QHD monitors and being left-handed, I use an ambidextrous mouse. I flip flop between a WASD Code keyboard and a Microsoft ergonomic keyboard – if I have a lot of typing to do then I prefer the Microsoft keyboard.

CPUAMD Ryzen 9 3900X
MotherboardASUS ROG Gaming-F X570
CPU CoolerNoctua NH-D15
RAMCorsair Vengeance LPX 128GB DDR4-3200 (4x 32GB)
Graphics CardGigabyte GT 1030 2G
StorageSamsung 970 EVO 1TB (boot)
Samsung 970 EVO 2TB
Samsung 860 EVO 1TB
Samsung 840 Pro 512GB
PSUCorsair RM750
CaseBe Quiet! 601
Monitor2x Dell U2715H
KeyboardWASD Code or Microsoft Ergonomic Keyboard
MouseRazer Diamondback
PC2021:Work

I recently stumbled across a post discussing the machine Linus Torvalds built in 2020. There are some common themes and choices across the builds: quiet, fast, reliable.

The BeQuiet! case is worth calling out – it’s very easy to build in, heaps of space, highly configurable and very quiet. While I don’t plan to open the case much, I do love the push button access to remove either side panel – no screws.

Play

The PC for gaming is aesthetically at the other end of the spectrum. The kids were very keen to go unicorn mode with an RGB party where possible. The PC also doesn’t need to run super quiet as typically whoever is using it has a set of headphones on. The machine ended up with a lot of the PC2020 build: the case, motherboard, AIO cooler, graphics card and power supply.

The main choice was probably the CPU, it didn’t need a crazy number of cores so it came down to an AMD 3600 or 3700X. In the end I went with the 3700X though I’m reasonably sure the 3600 would have been just fine too. With memory, again perhaps a little more than strictly needed with 32GB but this was of plenty for now and leaves room for more later if needed – and it has RGB.

Continuing the gaming theme, the monitor is a 144Hz LG QHD unit with NVidia G-Sync compatibility. The 2070 Super does a great job of driving this and there is no frame tearing. The keyboard and mouse are wireless from Razer, bought mostly because they were on special at the time.

CPUAMD Ryzen 7 3700X
MotherboardASUS ROG Crosshair VIII Formula X570
CPU CoolerCorsair iCue H100i RGB PRO XT
RAMCorsair Vengeance RGB Pro 32GB DDR4-3600 (2x 16GB)
Graphics CardEVGA GeForce RTX 2070 SUPER FTW3 ULTRA
StorageSamsung 970 EVO 500GB (boot)
Samsung 860 EVO 1TB
PSUCorsair HX850
CaseNZXT 440 Razer Edition
MonitorLG 27GL850-B 27″ QHD
KeyboardRazer Blackwidow V3 Mini Hyperspeed
MouseRazer Orochi V2
PC2021:Play

The hope is that in 2022, a post about the PCs will simply say – no change, unless I get a second BeQuiet! case.

The old kids PC went to a new home, which helped pay for the upgrade, where it is happily playing Minecraft and some older AAA titles.

PC 2020: My first self-build

Four-year cycles are common: leap year, the Olympics, various sporting world cups and as it turns out my personal computer refresh. This is the machine that I buy for me and it typically serves a number of needs: gaming, development, experiments, working from home, VR. The four-year cycle isn’t a planned refresh, it just so happens that when looking back I realized it’s been pretty consistent:

  • 2002: Apple PowerBook G4 1.0 12”
  • 2005: Dell 9100
  • 2008: Macbook Pro 15
  • 2012: Mac Pro (2010)
  • 2016: Custom pre-built I5-6600K PC
  • 2020: ?

There’s been a mix of Apple and PC hardware over the years, Intel-based Apple hardware has been used to run Windows via BootCamp as well as MacOS.

I have a confession, despite having been interested in computing from a young age I’ve never assembled a machine from scratch. Sure, I’ve upgraded machines and swapped out parts but never the whole shebang. Is 2020 the year to go full home build?

My current machine is good though unspectacular, built around an Intel i5 6600K. I bought this machine pre-built from PlayTech in January 2016 and it’s served as solid machine for both gaming and work. In the last four years the graphics card has been upgraded to a 1070 GTX to better support an Oculus Rift and I’ve added more memory but that’s about it. I run a pair of Dell QHD monitors, and the 1070 was driving them pretty happily until I started the campaign in the latest Call of Duty. The game would freeze and stutter at times despite running the recommended settings. That’s not enough of a reason to splurge a new PC, there were a number of other factors that came into play, so I started wondering what a refresh would look like…

When working, I might be running multiple instances of Visual Studio or I might be running virtual machines or standing up containers and so on. Virtual machines in particular like to have dedicated memory, sufficient vCPUs and fast storage. When gaming, I typically play story-based AAA titles at QHD such as the Tomb Raider reboots, Assassins Creed or the Call of Duty campaigns – I don’t stream or join multi-player games and such.

First attempt to improve gaming was to upgrade the graphics card to a 2070 RTX Super. Various hardware sites recommended the 2070 Super for QHD so I followed along and resisted the temptation to go all out. This did improve things but I was still getting some stalling and the CPU was now the bottleneck.

Four years is a long time in technology, I don’t really keep pace with hardware improvements unless I need to so it was pretty surprising to see how far things have moved on since 2016 for mainstream computing. Over the last year or two, we finally seem to have gone beyond quad core CPUs for the masses and AMD are almost universally recommended. Sure, Intel may still be winning the highest single core frequency but I’d like a more balanced machine and the AMD chips make much more sense. To support running multiple VMs concurrently, the AMD Ryzen 9 3900X looks good which provides 12 physical cores and 24 virtual cores. This triples the number of physical cores compared to my I5 and runs them all at a higher clock frequency. The chip isn’t cheap but it is less expensive than Intel’s high-end I9s and offers more cores. The jump from the 3900X to the 3950X isn’t worth it for me: an additional 550NZD (44% price increase) for four more cores.

Note: I use Hyper-V to manage VMs in Windows and currently there isn’t support for nested virtualization on AMD processors. Fingers crossed, it’s coming real soon now: https://techcommunity.microsoft.com/t5/virtualization/amd-nested-virtualization-support/ba-p/1434841

New CPU typically needs a new motherboard: in this case an AM4 board. There are two components I’ll typically go higher end for: motherboard and power supply. The current availability of parts in New Zealand limited my options, the ASUS ROG Crosshair VIII Formula X570 is top of the list. This has features I’m pretty sure I’ll never use, such as a built-in water block for cooling the VRM but there’s lots of IO including two NICs, it’ll take 128GB RAM and it’s well made.

The original plan was to re-use all the other existing pieces I had: case, PSU, memory, storage, AIO CPU cooler so I bought the CPU and motherboard. My existing case is an NZXT 440 Razer edition, I didn’t particularly want the Razer edition case but it’s what came with the original pre-built machine. It has a set of green light strips and front case lighting for the Razer logo that I never switch on. I’d opened up the case a couple of times for adding RAM and drives and I don’t like it. My dislike is mostly down to the previous machine I had: a 2010 Mac Pro. The ‘cheese grater’ case was so easy to work in, the quality was superb. [I would still run that machine if the motherboard hadn’t crapped out and Apples repair quote wasn’t so ridiculous – a $4000 machine, the quote for repairing it was $6500! ] The NZXT case feels cheap in comparison, that said the case is easy to work with and allows tidy cable management.

Swapping out the motherboard and CPU pretty much qualifies as a PC build, doesn’t it? All that was left in the case was the PSU and storage drives so it’s pretty close to a new build. I was hoping to reuse the Corsair H80i cooler but unfortunately, I didn’t have an AM4 mounting and no one in New Zealand seemed to stock the required bracket. The Ryzen 9 comes with a reasonable air cooler in the box so installed it. The installation went pretty smoothly, thanks to a number of youtube videos; the ASUS motherboard was well documented and the various connections clearly marked. With everything plugged in, I switched it on and experienced the euphoria of the machine booting first time. I was impressed with Windows, my existing install, it booted up first time and everything was there: 24 logical processors, memory, all drives. The memory was running at 2133 rather than 2666 so into the BIOS to set the XMP profile to 2666. This done, reboot and all is well.

I left the machine running overnight, it was happy come morning and so things were looking good. The Windows installation still had the drivers and utilities for the previous motherboard so they were removed and the equivalent ASUS utilities installed: Armoury Crate and AI Suite 3. Armoury Crate took care of determining and installing the necessary ASUS drivers, AI Suite provided tuning apps for fans and overclocking. Running the overclocking detection offered a 2% improvement which I passed on, leaving the settings as stock. The fan configuration started a long journey into figuring out how to set-up cooling. The case had 3x 120mm fans in the front drawing in air and a 140mm fan in the top also drawing in air. The H80i cooler had been configured as the rear fan so I moved the top 140mm fan to the rear to push air out the back. The CPU temperature was around 45C when relatively idle, climbing to 70C+ when under sustained load. The machine was noisy…

The NZXT case has a fan module which allow multiple fans to be powered and the cables tidily routed. However, the module uses 3 pin connectors and is not plugged into a fan header on the motherboard, rather taking power from a SATA power connector so the fans were running at full tilt. Moving the fans to a case fan header on the motherboard allowed the fan tuning software to calm the fans down.

Next came the whining noise, particularly when the system booted from cold. The noise was coming from one of the 120mm fans, which on inspection were pretty dirty after 4 years use. I cleaned out all the fans but the noise remained. When turning the fan by hand I could feel resistance in one of the units compared to the others so I decided to swap out the fans with some new Noctua case fans. These came with rubber mountings to help manage vibrations and with 4 pin connections for better fan control. With these in place the machine was quieter but still not quiet.

I could have, and perhaps should have, stopped here. The machine was running and stable, benchmarks were impressive, gaming was smooth and stutter free. After about a week, I added a Corsair H100i all-in-one water cooler. Following Corsairs recommendations, the radiator was installed in the top of the case with air being pulled into the case and then exhausted out of the back. This was my first time installing a water cooler myself and I got there in the end, they’re big, bulky and a pain to work with inside the case. Once installed, I booted the machine and it failed to POST: Error code 02 displayed on the little OLED screen on the motherboard. Frantic googling led to a page which suggested plugging in the HDMI cable to the graphics card, which I had forgotten to plug back in. Thank goodness this worked, the machine booted.

Looking at the temperatures in the Corsair iCue software, I could see the CPU temperature was now down to 32-36C when idle. Running the overclocking utility suggested running all twelve cores at 4.25 GHz which was an 11% improvement. This matched the overclock I previously had on the i5 6600K. Some googling later, I found various references stating that the 3900X doesn’t overclock very well and to be wary of the voltage needed to drive the CPU. With the VCPU at 1.29V, it was well below the 1.35V threshold mentioned in some posts and videos. I’m sure more maybe possible if I knew what I was doing, but I don’t really and this seems good enough. Temperature on the CPU rose to 36-40C and stayed there.

Ok, done. The new machine scores 7287 in CineBench R20 compared to the 1654 of the 2016 build I5 – that’s a lot of extra horsepower. Again, this would have been a really good point to stop.

PC Internals
PC2020 internals

But I now had an Intel I5, a Z170 motherboard and a Corsair AIO cooler left over. The kids have a 2nd hand HP EliteDesk G1 which they use for gaming and school work. It would be fun to give them an upgrade too…

This meant getting a new case and PSU. There isn’t a lot of space for a PC case where the kids machine sits so, I kept the NZXT440 and instead got a new, smallish Corsair ATX case for the kids, a 275Q. I did upgrade the PSU in my machine to a Corsair HX850 and put the existing PSU into the new case for the kids. The kid’s PC already had an SSD boot drive and a GeForce GTX 1650 graphics card so they were transferred over. I also added a couple of fans taken from the NZXT case. This was finally a complete PC build from parts which took around 3 hours, the last half hour was trying to figure out why I couldn’t install the USB cable into the CPU cooler pump. The thumbscrew for the CPU mount covered the USB socket and so the cable couldn’t fit – but how did it work before? After lots of head scratching, I remember that I had taken the Intel bracket off the pump and then re-installed it. When I did so, I managed to change the orientation of the four mounting holes which meant the USB socket was spoiling with the mounting screw. After a couple of attempts I finally managed to get the bracket on correctly and all was well.

The new Kids PC needed DDR4 RAM rather than the DDR3 from the HP so I took two sticks from my PC and popped them in. It booted, Windows was happy with the new hardware and so Gigabyte drivers and utilities were installed for the motherboard. With fan tuning done via the tuning app, I’m now calling the upgrade done.

PC2020

CPUAMD Ryzen 9 3900X OC@4.25GHz
MotherboardASUS ROG Crosshair VIII Formula X570
CPU CoolerCorsair iCue H100i RGB PRO XT
RAMGSkill RipJaws V 2666 (16GB x2)
Graphics CardEVGA GeForce RTX 2070 Super FTW3 Ultra RGB
StorageSamsung 970 EVO 500GB (boot)
Samsung 850 EVO 500GB
Samsung 830 500GB
Intel 730 480GB
PSUCorsair HX850
CaseNZXT 440 Razer Edition
PC2020 parts list

Kids PC2020

CPUIntel i5 6600K OC@4.2GHz
MotherboardGigabyte Z170 Gaming 3
CPU CoolerCorsair H80i GT
RAMGSkill RipJaws V 2666 (16GB x2)
Graphics CardGigabyte GeForce GTX 1650
StorageSamsung 860 EVO 1TB
PSUFSP Aurum 650W Gold
CaseCorsair 275Q
Kids PC2020 parts list

Benchmark for PC2020

Standard Settings

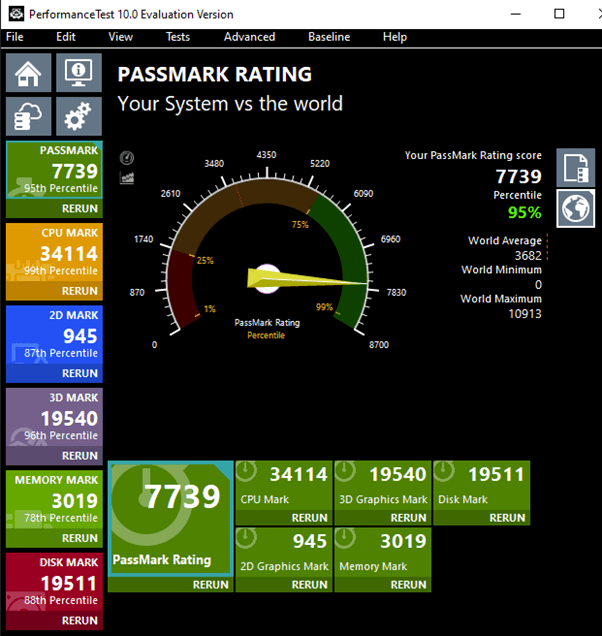
Passmark result with no overclocking

Overclocked

Passmark result with overclocking

The drop in memory performance with the OC settings is odd. I might look at getting some faster RAM in the future, the motherboard will support 128GB so I’ll go 2x 32GB modules to enable maxing out the memory further down the road.

The case of the Fiddler heisenbug

There is a presentation I give to our graduates during their first week with us, the second slide is:

EverythingYouKnowIsWrong

This is taken from the multi-media overload that was U2s Zoo TV tour. I use it to try to get our graduates to accept that they are really back at the start of their learning process. This is pretty much how I felt a week or two back when one of our consultants said that they were seeing lots of HTTP 401 authentication traffic while our application was running. I’d personally spent a lot of time over the years trying to make sure that we were as efficient as possible so I was sceptical to say the least…

Background

The services architecture for the product I work on follows the Command Query Responsibility Separation approach which I’ve talked about before. In summary we fetch data from an OData service provided by WCF Data Services and then make updates via a suite of services implemented using regular SOAPy WCF. We closely monitor the message exchange between our applications and services to ensure that we aren’t too chatty, messages aren’t too big and so on – we do this using the excellent Fiddler. Many moons ago, I spent quite some time getting my head around how to correctly configure IIS and WCF to use Kerberos to allow the services to be scaled out over a web farm. By now I’ve run through this on numerous test environments and real world environments so I was pretty confident I know how it works.

The Problem

Our software runs on-premise within the walled garden of the corporate network. We support some of the largest law firms in the world and so on occasion have to deal with some very wide area networks. The connection from desktop to server can take place over long distances with the characteristics of high latency and low bandwidth; any messaging overhead can be painful. For years now we’ve used Fiddler to look at our services as all the call activated services use HTTP. At one client, Fiddler was not working [which turned out to be a conflict with the McAfee software they used] and so they used Wireshark instead. When observing the HTTP traffic in Wireshark, our consultants and the client saw many HTTP 401 authentication responses, far more than we expected. Each 401 response results in additional latency delay and requires additional messages to be exchanged between the client and the server. In our testing to date, we believed we had tuned the services to require only a single 401 authentication response and then to cache and present the credentials on each subsequent request.


TL;DR

To stop a WCF Data Services request, secured using Windows Authentication, requiring authentication on every call – you need to set the PreAuthenticate flag to true on the HttpWebRequest via the SendingRequest2 event on the generated context. Fiddler (and Web Proxy in the Microsoft Message Analyzer) hides this from you because it implements a connection pool of Keep Alive connections.


Reproducing the issue

The first task was to reproduce the behaviour inside one of our test environments. I’m fortunate to have a very well spec’d HP Z420 on my desk which is a great Hyper-V server. Inside Hyper-V I have a private domain set up which has a couple of load balanced application servers running our software. First off, I ran the client software on both Windows 7 and Windows 8.1 with Fiddler running in the background, no sign of the additional 401s. I then switched over to using a lower level network monitoring but rather than using Wireshark, I decided to try out the Microsoft Message Analyzer. This is Microsoft’s replacement for the Network Monitor tool, it provides a number of different filters, two of which were of interest:

  • web proxy – same deal as Fiddler, looking at HTTP
  • local link layer – all traffic on the NIC

Using the web proxy produced the same results as Fiddler however using the local link layer filter showed lots of additional 401 responses – when I ran the Message Analyzer with both web proxy and the local link layer filters there was no additional 401s. We had hit a Heisenbug, when observing the HTTP traffic through a web proxy, the proxy was changing the behaviour of the traffic.

Confirm our current understanding

My faith in our current collective understanding of what was happening was pretty shaken so I ran through the various settings that I previously thought would avoid these 401s:

1. Is the URL of the service trusted? Windows must consider the service URL to be trusted to pass Kerberos tickets. Any easy way to check the zone of any URL is the following code snippet:

var zone = System.Security.Policy.Zone.CreateFromUrl("http://wsakl001013.ap.aderant.com/Expert_Local");
Console.WriteLine(zone.SecurityZone);

If necessary, add the service host URL or a matching pattern to the Local Intranet Zone via IE:

In this example, *.aderant.com has been added to the local intranet zone.


2. Are the load balanced services running as a domain account? Does this account have an appropriate HTTP SPN registered against it?


3. Do the various IIS web applications have the useAppPoolCredentials flag set in configuration? This instructs IIS to expect the Kerberos SGT (service granting ticket) to be encrypted using the credentials of the account used by the mapped application pool, rather than the default machine account.


4. Is Kerberos configured to use a transport session rather than a connection per call for authentication? This is set in IIS against the web application using the authPersistNonNTLM setting.

This adds a Persistent-Auth header to the HTTP response (seen here using Message Analyzer):

image

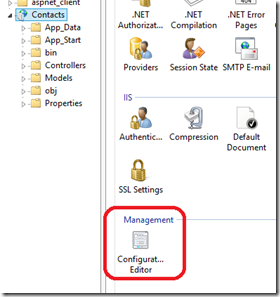
These settings are available from within the IIS Manager using the Configuration Editor:

IISConfigEditor

Navigate to the system.webServer/security/authentication/windowsAuthentication settings:

image

Set the properties as required. If you want to programmatically set these values via script, IIS will helpfully generate the scripts for you. Look over on the right hand side of the Configuration Editor and you’ll see a ’Generate Script’ option.

image

Clicking on this will generate a change script for you in a number of technologies, I tend to favour PowerShell:

image

All this checked out on my environment but I wanted to ensure that NTLM was not in play (here). To do this I enabled NTLM logging on the domain controller using group policy. Using gpedit.msc, I enabled the ‘Network Security: Restrict NTLM: Audit Incoming NTLM Traffic’ and  ‘Network Security: Restrict NTLM: Audit NTLM authentication in this domain’ policies [under Windows Settings, Security Settings, Local Policies, Security Options]:

image

Interesting it showed that there was unexpected NTLM traffic – from the AppFabric services to the SQL Server. The MSSQLService was set-up to run as a domain account, service.sql, but the appropriate SPN had not been mapped to that account:

> setspn –a MSSQLSvc/SqlServer2012.expert.local:1433 service.sql

> setspn –a MSSQLSvc/SqlServer2012:1433 service.sql

I mapped both the FQDN and the NETBIOS name formats just to be sure. This resolved the issue and I no longer saw NTLM traffic.

image

What Next?

At this point I thought the environment was configured as it should be but I was still seeing the additional 401s. After a lot of searching and head scratching I came across this post from Fiddler author, Eric Lawrence. The rub being:

Keep-Alive

In some cases, the time required to open a new network connection to the server is greater than the time required to send the request and download the response. Therefore, if the client opens a new connection for every request, the application’s performance is greatly degraded. The practice of reusing a single TCP/IP connection for multiple requests is called “keep-alive” and it’s the default behaviour in HTTP/1.1. However, clients or servers may choose to disable keep-alive by either sending a Connection: close header or by abruptly closing the connection after each transaction.

Fiddler maintains a “connection pool” of idle keep-alive connections to the server. When the a client request comes in, this pool is first checked to determine if an existing connection is available on which the request can be sent. Even if the client specifies a Connection: close request header, that only causes Fiddler to close the client’s connection after the response is sent—the server connection is returned to the pool (unless it too disabled keep-alive).

What this means is that if your client isn’t using Keep-Alive connections, its performance can be severely impacted. However, when Fiddler is introduced, performance is improved because “expensive” server connections are reused.(Since Fiddler and the client are (typically) running on the same computer, establishing a new connection from the client to Fiddler is very fast.)

The fix for this problem is simple: Ensure that your client is using KeepAlive connections. That’s as simple as:

  1. Ensure that you’re using HTTP/1.1
  2. Ensure that you haven’t disabled Keep-Alive (e.g. set the KeepAlive property of the HTTPWebRequest object to true)
  3. Don’t send Connection: Close headers

Note that creating connections to servers can be even more expensive than the simple TCP/IP establishment cost. First, there’s TCP/IP Slow-Start, a congestion-management feature of the protocol that means that new connections have a slower transfer rate than longer-lived connections. Next, if you’re using HTTPS, there’s an expensive cryptographic handshake which must be performed on each new connection. Lastly, if your connections use either the NTLM or Negotiate authentication protocols, you may find that each new connection requires a 3-step handshake (e.g. the server sends a HTTP/401 challenge, the client resends the request, the server sends another HTTP/401 challenge, the client resends the request with a challenge-response, and the server finally sends a HTTP/200). Because these are “connection-oriented” authentication protocols, subsequent requests over an existing connection may be able to avoid these extra round-trips.

Here is the heisenbug, Fiddler is maintaining a Keep-Alive connection to the server even though my call may not be.

So how does this relate to the WCF service calls? For the basicHttpBinding, the Keep-Alive behaviour is enabled by default, it can optionally be turned off via a custom binding, see here.

Back to Basics

At this point I was still convinced I should not be seeing those additional 401s, so I decided to build a very simple secured WCF service and generate a proxy to the standard OData service we use.

Here is a WCF Service that simply says Hello to the calling Windows user.

image

WCF Configuration as follows:

image

Visual Studio created a service reference for me an I simply called the service a number of times: both reusing the proxy as well as closing the proxy and recreating it:

image

The link layer trace was as follows:

image

This was as expected, a single 401 but then 200s on subsequent calls. Kerberos was being used successfully and a transport level session was established! Just for completeness I could see the HTTP Keep-Alive header in the POST:

image


OK, on to the WCF Data Service. Again in Visual Studio I generated a service reference then:

image

This resulted in:

image

And the following trace:

image

At last here was the repeated 401/200 behaviour.

I checked for the Keep-Alive header in the request:

image

And looked for the Persistent-Auth header in the response:

image

Both present.

More head scratching.

More searching.

Then I posted this question to the Microsoft WCF Data Services forum.

While waiting for an answer, a colleague and I took at look at the System.Data.Services.Client.DataServiceContext base class for the generated context object. Working through that code, I came across the HttpWebRequest class which had a PreAuthenticate property which looked exactly what I wanted. A little more digging and then I found I could do this:

var context = new ExpertDbContext(…

context.Credentials = CredentialCache.DefaultNetworkCredentials;

context.SendingRequest2 += context_SendingRequest2;


static void context_SendingRequest2(object sender, SendingRequest2EventArgs e) {

((HttpWebRequestMessage)e.RequestMessage).HttpWebRequest.PreAuthenticate = true;

}


This was it!

Testing the code with this small change and the 401s were gone from the WCF Data Service traffic. Just as I was grabbing a celebratory cup of coffee, a colleague asked if I had seen the response to my question on the forum? I had not; it validated the above approach – Thank you Fred Bao.


Wrapping Up

This took about a week elapsed to work through, we’ve now updated our query service (OData) proxy to set the PreAuthenticate flag and can see improved system performance, particularly over constrained WAN connections. That Fiddler hid this really threw me, heisenbugs are really hard to dealt to.


Windows 8 and AppFabric Installation Pain

I’m getting a sense of déjà vu, I’ve just built a new Windows 8 virtual machine and spent a couple of hours fighting with the Windows Server AppFabric 1.1 install. I’m pretty sure this is at least the second time I’ve been on this merry dance so I’ll document it this time.

So let’s start of with a quick summary of the problem and solution: when attempting to install Windows Server AppFabric 1.1 (service hosting) on Windows 8 the installer fails with a MSI 1603 error. Searching the web for this error suggests the following:

1. Check the PSModulePath environment variable to ensure it is not corrupted, e.g. has a stray “ character in it. http://social.msdn.microsoft.com/Forums/vstudio/en-US/561f3ad4-14ef-4d26-b79a-bef8e1376d64/msi-error-1603-installing-appfabric-11-win7-x64

2. Add C:\Windows\System32\WindowsPowerShell\v1.0 to the PSModulePath

These two approaches didn’t resolve my install issues so I dug through the installer logs, more on that shortly. Cutting to the chase I needed to perform the following steps:

1. Check the local machine security groups and remove the AS_Administrators or AS_Observers groups if they had been left behind from a previous failed AppFabric installation attempt.

2. Ensure that the Windows Process Activation Service as well as WCF activation options have been installed.

image

image


Diagnosis Walkthrough…

The path to enlightenment was not straight and started with the logging created by the installation process, found in C:\Users\Stef Sewell\AppData\Local\Temp.

image

Three log files and an error log was produced for each failed install attempt. The most interesting files are the AppServerSetup1_1_CustomActions(…).log as they contained the various errors.

The earliest log file listed the following failure:

19/07/2013 9:19:06 p.m. EXEPATH=c:\Windows\system32\\icacls.exe PARAMS=c:\Windows\SysWOW64\\inetsrv\config /grant AS_Observers:(OI)(CI)(R) LOGFILE=C:\Users\Stef\AppData\Local\Temp\AppServerSetup1_1_CustomActions(2013-07-19 21-18-47).log
Error: c:\Windows\SysWOW64\\inetsrv\config: The system cannot find the file specified.
Output: Successfully processed 0 files; Failed processing 1 files
ExitCode=2

Seeing this error, I added in the missing folder config folder to C:\Windows\SysWOW64\inetsrv  but then I got the following error on the next attempt:

20/07/2013 6:49:09 p.m. EXEPATH=C:\Windows\system32\\net.exe PARAMS=localgroup AS_Observers /comment:”Members of this group can observe AppFabric.” /add LOGFILE=C:\Users\Stef\AppData\Local\Temp\AppServerSetup1_1_CustomActions(2013-07-20 18-48-50).log
Error: System error 1379 has occurred.
Error: The specified local group already exists.
ExitCode=2

Looking the in local groups on the machine, I could see the AS_Observers group was present and had not been removed by the previous failed install. I removed the group. Re-running the installer and I now get:

20/07/2013 7:09:38 p.m. EXEPATH=C:\Program Files\AppFabric 1.1 for Windows Server\ase40gc.exe PARAMS=/i administration LOGFILE=C:\Users\Stef\AppData\Local\Temp\AppServerSetup1_1_CustomActions(2013-07-20 19-09-23).log
Output: Microsoft (R) AppFabric 1.1 for Windows Server Setup Utility. Version 1.1.2106.32
Output: Copyright (C) Microsoft Corporation. All rights reserved.
Output: Workstation [Version 6.2.9200]
Output: OS Edition 0x30: Professional
Output: Load XML resource: (id=101, size=2868)
Output: Load XML resource: (id=102, size=8696)
Output: Load XML resource: (id=103, size=511)
Output: Load XML resource: (id=104, size=546)
Output: Load XML resource: (id=105, size=6759)
Output: Load XML resource: (id=103, size=511)
Output: [ServicingContext]
Output: INSTALLER_WINNING_COMPONENT_IDENTITY=
Output: INSTALLER_WINNING_COMPONENT_PAYLOAD=
Output: INSTALLER_WINNING_COMPONENT_MANIFEST=
Output: INSTALLER_WINNING_COMPONENT_VERSION=
Output: INSTALLER_SHADOWED_COMPONENT_IDENTITY=
Output: INSTALLER_SHADOWED_COMPONENT_PAYLOAD=
Output: INSTALLER_SHADOWED_COMPONENT_MANIFEST=
Output: INSTALLER_SHADOWED_COMPONENT_VERSION=
Output: Servicing type is None.
Output: [RunInstaller]
Output: Attempt 1 of 3: SuppressErrors=False
Output: [Initialize]
Output: Info: Initializing for update to administration.config…
Output: Installer ERROR: 0x80040154 Class not registered
Output: (Waiting 5 seconds)
Output: Attempt 2 of 3: SuppressErrors=False
Output: [Initialize]
Output: Info: Initializing for update to administration.config…
Output: Installer ERROR: 0x80040154 Class not registered
Output: (Waiting 10 seconds)
Output: Attempt 3 of 3: SuppressErrors=False
Output: [Initialize]
Output: Info: Initializing for update to administration.config…
Output: Installer ERROR: 0x80040154 Class not registered
Output: ERROR: _com_error: 0x80040154
Output: Exit code: 0x80040154 Class not registered

ExitCode=-2147221164

Three attempts to perform the step involving as40gc.exe failed so back to scouring the web, which turned up http://stackoverflow.com/questions/15415616/how-can-i-get-microsofts-appfabric-1-1-installed-on-windows-server-2012-os

Now I was getting somewhere, I was missing certain Windows features, in particular the Windows Process Activation Service and the WCF HTTP and non-HTTP activation features. Unfortunately the PowerShell servermanager module is not available on Windows 8 so I installed them via the ‘Program and Features’ control panel.

image

image

With these features in place, the AppFabric installer was successful. It was at this point I vaguely remembered I’d been through this process 6 months ago when I last set-up a fresh Windows 8 VM, now it’s written up for next time.

Upgrading to Windows 8

For me, the brightest feature in Windows 8 right now is Hyper-V. I no longer need to dual-boot my laptop between Windows 7 and Windows Server 2008 R2 when I need to run an x64 OS in a virtual machine (Virtual PC only supported x86 VMs). As well as the convenience of being able to do everything from a single host OS, I also get to reclaim 60GB of space on my boot SSD.

My cunning plan to stay productive while setting up the Windows 8 environment involved cloning my existing Windows 7 install to VHD and then run that within Hyper-V. Over time I’ll copy what I need from the drive image into the Win8 environment but for now I can still work. To clone a physical disk to VHD involved the use of Disk2VHD from Microsoft / SysInternals. This is very easy to use and within an hour I had a VHD image of my boot SSD.

The install of Windows 8 was delegated, we have an PXE boot environment set-up in the office so I let the IT guys trial their Windows 8 install on my Thinkpad. Tocks ticked and after a couple of hours the machine was back. I’ve been playing with Windows 8 in bootcamp on my aging Macbook Pro so I know enough to find my way around and configure it. Like many others, I’d love to drive this with a good touchscreen (i.e. NOT the Dell kicking around the office), but mouse and keyboard is working out OK. My first, naïve thought was that everything would play well just like Windows 7 but this is not the case. I have a dock on my desk for the Thinkpad W510 and so I docked it thinking that I would get both monitors fire up… no joy, no picture. Unplugging one of the monitors and I get a picture, both plugged in, nothing. Off to Lenovo for a new video driver, the ‘gold’ drivers aren’t available yet only beta drivers which I installed. Bad idea. This completely screwed up Windows to the point where it eventually went into recovery mode and rolled back to a restore point. A google later and I find a post matching my symptoms. Looks like I need to wait for the Windows 8 drivers to be released…

Getting my VHD to run in Hyper-V was more of an adventure than I planned on too. After setting up a new virtual machine using the VHD, I started it only to get an error stating it was not bootable. Panic. Googling for help led to: http://msmvps.com/blogs/rfennell/archive/2011/07/13/moving-a-vhd-boot-disk-to-hyper-v.aspx

This didn’t quite match my scenario but was close enough…

1. I mounted the VHD in Windows 8 via the Disk Management tool and could see three partitions: the boot partition, the Windows 7 partition and the Windows Server 2008 R2 partition. Only the Windows 7 partition was NTFS, the other showed as raw. I could map a drive to the Windows 7 partition so at least I could access the files, the panic lessened.

2. I removed the two raw partitions and then created a new NTFS partition in the space originally allocated to the boot partition and named it ‘System Reserved’.

3. I added the Windows 7 ISO as the DVD drive to the VM and set the boot order so that it would boot into the installer. When the first dialog screen popped up I hit SHIFT + F10 to get to a command prompt. Unfortunately the Windows 7 partition was mapped to D: and the boot partition mapped to C:. I needed to swap these around.

4. Following steps from TechNet, using the DISKPART tool I could:

>DISKPART

>list volume

>select volume 0

>assign letter=T

>select volume 1

>assign letter=C

>select volume 0

>assign letter=D

>exit

5. With the drive letters correct I could now create a new boot partition:

> bcdboot C:\Windows /s D:

>DISKPART

>select disk 0

>list partition

>select partition 1

>active

>exit

6. I rebooted the VM and thankfully it booted into my previous Windows 7 environment.

The VHDs I had set-up under Windows Server 2008 R2 came across into Windows 8 Hyper-V without any problems. I now have my test VMs and my previous development environment all registered and running in Hyper-V:

image

Apart from the video driver issue, I’m very happy with Windows 8 so far and I love having Hyper-V alongside all my other apps.

Windows Identity Foundation, first steps…

I’ve been slowly working through the excellent book Programming Windows Identity Foundation by Vittorio Bertocci. I was getting a little restless though and wanted to see some code so I found this walkthrough and decided to play along. Things didn’t go as smoothly as I had hoped but I did learn more than I bargained for…

One of the first requirements to get the sample running is to ensure that you have SSL enabled on your default web site. This is not a common task for most developers so I’ll elaborate a little:

Setting up HTTPS

IIS Manager supports the creation of a self-signed certificate which is sufficient for development purposes. The server configuration provides a‘Server Certificates’ option as below, in the Actions menu there is a ‘Create Self-Signed Certificate…’ item.

image

There’s not much to the certificate creation process, enter a friendly name for the certificate. In my case I lacked imagination and went with ‘TestCertficateForWIF’. The certificate is created in the machine certificate store so running certmgr.msc doesn’t help as it opens the user store. Instead I ran the mmc.exe directly and added the certificate manager snap-in explicitly, when asked to choose a store I went with the local machine store.

image

image

image

Looking in the Personal | Certificates node reveals the newly created certificate.

image

Setting up an HTTPS binding for the Default Web Site is now possible. Select the site in IIS manager and then choose to Edit Bindings… from the context menu.

image

The dialog allows you to add a new HTTPS binding, you just select the certificate you want to use as part of the encryption process.

image

I next ran through the various steps in the walkthrough but when I tried the run the completed sample I got a KeySet error.

Additional Notes:

  • The certificate name for the DemoSTS web.config only requires CN=, not two.

image

  • As we are using Windows authentication the console client does not need to pass credentials explicitly. When I set the credentials manually to a local test account I would see my domain account as the name in the returned claim.

image

Troubleshooting the Sample

A quick search suggested that the AppPool account my services were running as did not have access to the private key of the certificate. OK, back into the machine certificate store and ‘Manage Private Keys…’ for the certificate.

image

The web applications for the services were mapped to the ApplicationPoolIdentity (I’m running IIS7.5) so I tried adding the read right to the ‘IIS AppPool\DefaultAppPool’ account. This didn’t seem to help so I resorted to creating a specific service account and assigning it the read permission for the certificate.

image

I created a new application pool to run as this new ‘service.sts’ user and set the web applications use this application pool. This was good and resolved by KeySet error but I was now getting a fault back from my secure WCF service. After a little head scratching I fired up Fiddler to watch the traffic:

image

OK – I could see the secure WCF service calling the DemoSTS, the DemoSTS doing it’s work and then calling back to the secure service, then a 500 failure. Looking at the response message for the 500:

image

For some reason I was getting an ‘Invalid Security Token’ error. I knew the error was in the secure WCF service but not much more. While looking through the web.config for the service, I found commented out trace configuration:

image

So I enabled the tracing and re-ran the client. The WIFTrace.e2e file popped into the service directory and I used the Microsoft Service Trace Viewer to look at the log:

image

Looking at the error detail:

image

‘The issuer of the security token was not recognized by the IssuerNameRegistry…’, that looked familiar so back to the web.config.

<microsoft.identityModel>

<service name=”SecureWCFService.Service”>

<audienceUris>

<add value=”http://wsakl0001013.ap.aderant.com/SecureWCFService/Service.svc&#8221; />

</audienceUris>

<issuerNameRegistry type=”Microsoft.IdentityModel.Tokens.ConfigurationBasedIssuerNameRegistry, Microsoft.IdentityModel, Version=3.5.0.0, Culture=neutral, PublicKeyToken=31bf3856ad364e35″>

<trustedIssuers>

<add thumbprint=”?????????????????????????????” name=”http://wsakl0001013.ap.aderant.com/DemoSTS/Service.svc&#8221; />

</trustedIssuers>

</issuerNameRegistry>

</service>

</microsoft.identityModel>

I’ve removed the actual thumbprint, but here was where the service was configured to accept tokens from a STS using a particular certificate identified by it’s thumbprint. I needed the thumbprint of the certificate I had created, easily done via PowerShell:

> $certificate = Get-ChildItem -Path Cert:\LocalMachine\My | where { $_.Subject -match ‘CN\=WSAKL0001013.ap.aderant.com’ }

>$certificate.thumbprint

The thumbprint provided by PowerShell did not match my web.config so I updated the config.

Happy days, the sample now ran:

image

Workflow Services & MSMQ Revisited

I’ recently dusted off a WCF sample I’d written and blogged about a year or two ago. During the process of getting it to work again, I discovered the blog posting is incorrect so I’m reposting with corrections and additional explanation.

Tom Hollander published a great set of posts on this topic which I needed…

http://blogs.msdn.com/b/tomholl/archive/2008/07/12/msmq-wcf-and-iis-getting-them-to-play-nice-part-1.aspx

http://blogs.msdn.com/b/tomholl/archive/2008/07/12/msmq-wcf-and-iis-getting-them-to-play-nice-part-2.aspx

http://blogs.msdn.com/b/tomholl/archive/2008/07/12/msmq-wcf-and-iis-getting-them-to-play-nice-part-3.aspx

We needed a quick proof of concept to show that a workflow service could be activated via a message sent over MSMQ. First part was workflow design and coding, this was the easy part. All I wanted to do was accept a custom type, in this case a TimeEntry, from a SubmitTime service operation that belonged to an ITimeEntryContract. On receiving the time entry I would simple log the fact that it arrived into the event log. This is pretty much the “Hello, World!” of the services demos. The second part was getting the configuration correct…

One of the promises of WCF is that it gives us a unified communication model regardless of the protocol: net.tcp, http, msmq, net.pipe and it does. The best description I’ve heard for WCF is that it is a channel factory, and you configure the channels declaratively in the .config file (you can of course use code too if you prefer). The key benefit is that the service contract and implementation, for the main part, can be channel agnostic. Of course there are the exceptions to prove the rule such as a void return being required by an MSMQ channel but for the most part it holds. As it turns out, it was true that I needed to make no changes to code to move from a default http endpoint to a MSMQ endpoint. I need need to do a lot of configuration and setup though which is not that well documented. This post hopes to correct that is some small way.

First up the easy part, writing the code.

In Visual Studio 2010 I started a new ‘WCF Workflow Service Application’ project. First I define my TimeEntry model class:

using System;

namespace QueuedWorkflowService.Service {
    public class TimeEntry {
        public Guid TimekeeperId { get; set; }
        public Guid MatterId { get; set; }
        public TimeSpan Duration { get; set; }

        public override string ToString() {
            return string.Format(“Timekeeper: {0}, Matter: {1}, Duration: {2}”, TimekeeperId, MatterId, Duration);
        }
    }
}

Then I defined a code activity to write to the time entry provided into the event log:

using System;
using System.Diagnostics;
using System.Activities;

namespace QueuedWorkflowService.Service {
    public sealed class DebugLog : CodeActivity {
        public InArgument<string> Text { get; set; }

        protected override void Execute(CodeActivityContext context) {
            string message = string.Format(“Server [{0}] – Queued Workflow Service – debug :{1}”, DateTime.Now, context.GetValue(this.Text));
            Debug.WriteLine(message);
            EventLog.WriteEntry(“Queued Service Example”, message, EventLogEntryType.Information);
        }
    }
}

All the C# code is now written and I create my workflow:

I need a variable to hold my time entry so I define one at the scope of the service:

The project template creates the CorrelationHandle for me but we won’t be using it.

The receive activity is configured as follows:

With the Content specified as:

This is such a simple service that I don’t need any correlation between messages, it just receives and processes the message without communicating back to the sender of the message. Therefore I also cleared out the CorrelatesOn and the CorrelationInitializer properties.

Finally I set up the Debug activity to write the time entry to the event log:

That’s it! I’m done. This now runs using the default binding introduced in WCF4 (http and net.tcp). Starting up the project launches my service and the WCF test client is also opened pointing to my new service. The service is running in Cassini, the local web server built into the Visual Studio debugging environment.

15 minutes, or there about, to build a workflow service. What follows a summary of the steps discovered over the next 4 hours try to convert this sample from using an http endpoint to an msmq endpoint.

Default Behaviour
One of the key messages Microsoft heard from the WCF 3 community was that configuration was too hard. To even get started using WCF you had to understand a mountain of new terms and concepts including: channels, address, binding, contract, behaviours,… the response to this in .NET 4 is defaults. If you don’t specify an endpoint, binding etc then WCF creates a default one for you based upon your machine configuration settings. This makes getting a service up and running a very straightforward experience. BUT as soon as you want to step outside of the defaults, you need the same knowledge that you needed in the WCF 3 world.

Here’s the web.config I ended up with after a couple of hours, the MSMQ settings were a voyage of personal discovery… (http://msdn.microsoft.com/en-us/library/ms731380.aspx)

<?xml version=”1.0″ encoding=”utf-8″?>
<configuration>
  <system.web>
    <compilation debug=”true” targetFramework=”4.0″ />
  </system.web>
  <system.serviceModel>
    <services>
      <service name=”TimeEntryService”>
        <endpoint
            binding=”netMsmqBinding”
            bindingConfiguration=”nonTxnMsmqBinding”
            address=”net.msmq://localhost/private/QueuedWorkflowService/TimeEntryService.xamlx”
            contract=”ITimeEntryContract” />

        <endpoint
            binding=”netMsmqBinding”
            bindingConfiguration=”txnMsmqBinding”
            address=”net.msmq://localhost/private/QueuedWorkflowServiceTxn/TimeEntryService.xamlx”
            contract=”ITimeEntryContract” />
        <endpoint
            address=”mex”
            binding=”mexHttpBinding”
            contract=”IMetadataExchange” />
      </service>
    </services>
    <behaviors>
      <serviceBehaviors>
        <behavior>
          <serviceMetadata httpGetEnabled=”true” />
        </behavior>
      </serviceBehaviors>
    </behaviors>
    <bindings>
      <netMsmqBinding>
        <binding
            name=”nonTxnMsmqBinding”
            durable=”false”
            exactlyOnce=”false”
            useActiveDirectory=”false
            queueTransferProtocol=”Native”>
          <security mode=”None”>
            <message clientCredentialType=”None” />
            <transport
                msmqAuthenticationMode=”None
                msmqProtectionLevel=”None” />
          </security>
        </binding>

        <binding
            name=”txnMsmqBinding”
            durable=”true”
            exactlyOnce=”true”
            useActiveDirectory=”false”
            queueTransferProtocol=”Native”>
          <security mode=”None”>
            <message clientCredentialType=”None” />
            <transport
                msmqAuthenticationMode=”None”
                msmqProtectionLevel=”None” />
          </security>
        </binding>
      </netMsmqBinding>
    </bindings>
  </system.serviceModel>
    <microsoft.applicationServer>
        <hosting>
            <serviceAutoStart>
                <add relativeVirtualPath=”TimeEntryService.xamlx” />
            </serviceAutoStart>
        </hosting>
    </microsoft.applicationServer>
</configuration>

The two important sections are the endpoint and the netMsmqBinding sections. A single service is defined that exposes two MSMQ endpoints, a transactional endpoint and a non-transactional one. This was done to demonstrate the changes required in the netMsmqBinding to support a transactional queue over a non-transactional queue; namely the durable and exactlyOnce attributes. In both cases no security is enabled. I had to do this to get the simplest example to work. Note that the WCF address for the queue does not include a $ suffix on the private queue name and matches the Uri of the service.

We still have some way to go to get this to work, we need a number of services to be installed and running on the workstation:

Services
• Message Queuing (MSMQ)
• Net.Msmq Listener Adapter (NetMsmqActivator)
• Windows Process Activation Service (WAS)

I also ensured that AppFabric was running as this is the easiest way to start the debugging process:
• AppFabric Event Collection Service (AppFabricEventCollectionService)

If you don’t have these services registered on your workstation you will need to go into the ‘Programs and Features’ control panel, then ‘Turn Windows features on or off’ to enable them (Windows 7).

With the services installed and started you need to create a private message queue to map the endpoint to (see : http://msdn.microsoft.com/en-us/library/ms789025.aspx ). The queue name must match the Uri of the service.

image

The sample is configured to run without security on the queues, i.e. the queues are not authorized. You must allow the anonymous login ‘send’ rights on the queues. If you don’t, the messages will be delivered but the WAS listener will not be able to pick up the messages from the queue.

image

If you have problems and do not see the message delivered to the correct queue, have a look in the system Dead Letter queues.

image

You also need to change your VS2010 project to use IIS as the host rather than Cassini. On the project properties dialog, open the Web tab:

As I wanted events from this service to be added to my AppFabric monitoring store, I also added a connection string to the mapped web application and then configured AppFAbric monitoring to use that connection.


And in AppFabric configuration:

Finally you also need to enable the correct protocols on the web application (Manage Application… | Advanced Settings):

I’ve added in net.msmq for queuing support and also net.pipe for the workflow control endpoint.

Make sure that the user the application pool is running as has access to read and write to the queue.

With all the server configured I then wrote a simple WPF test application that used a service reference generated by VS2010, this creates the appropriate client side WCF configuration. The button click handler called the service proxy directly:

private void submitTimeEntryButton_Click(object sender, RoutedEventArgs e) {
    using (TimeEntryContractClient proxy = new TimeEntryContractClient(“QueuedTimeEntryContract”)) {
        TimeEntry timeEntry = new TimeEntry {
                                            TimekeeperId = Guid.NewGuid(),
                                            MatterId = Guid.NewGuid(),
                                            Duration = new TimeSpan(0, 4, 0, 0)
                                            };

        string message = string.Format(“Client [{3}]- TimekeeperId: {0}, MatterId: {1}, Duration: {2}”,
            timeEntry.TimekeeperId,
            timeEntry.MatterId,
            timeEntry.Duration,
            DateTime.Now);

        proxy.SubmitTimeEntry(timeEntry);
        EventLog.WriteEntry(“Queued Service Example”, message, EventLogEntryType.Information);
    }
}

And the awesome UI:

Click the button and you get entries in the event log, a client event and the server event:

image

I made no changes to the code to move from an http endpoint to a MSMQ endpoint, but it’s not as simple as tweaking the config and you’re good to go. I’d love to see some tooling in VS2010 or VS vNext to take some of the pain away from WCF config, similar to the tooling AppFabric adds into IIS. Until that happens, there are plenty of angle brackets to deal with.

WiXing Lyrical (Part 2)

Picking up from where we left off previously with the product.wxs file, next we come to the Media element.

<Media Id=”1″ Cabinet=”media1.cab” EmbedCab=”yes” />

This is the default media entry created by Votive. The files to be installed are constructed into a single cabinet file which is embedded within the MSI.

Specifying the Install Location

Following the media is the directory structure we want to install the application into. A set of directory elements are nested to describe the required structure.

<Directory Id=”TARGETDIR” Name=”SourceDir”>
  <Directory Id=”dirAderant” Name=”AderantExpert”>
    <Directory Id=”dirEnvironmentFolder” Name=”[EXPERTENVIRONMENTNAME]” >
      <Directory Id=”INSTALLLOCATION” Name=”ExpertAssistantInstaller”>
      <!–additional components go here –> 

      </Directory>
      <Directory Id=”ProgramMenuFolder”>
        <Directory Id=”ApplicationProgramsFolder” Name=”Aderant”>
        </Directory>
      </Directory>
    </Directory>
  </Directory>
</Directory>

The TARGETDIR is the root directory for the installation and by default is set to the SourceDir. We then set-up the directory structure underneath \AderantExpert\Environment\ExpertAssistantInstaller. The environment folder is set to the value in the EXPERTENVIRONMENTNAME property. The INSTALLLOCATION Id specifies where the files will be installed to. If you want to install into the Program Files folder, see here.

In addition to specifying the target location for the install files, a folder is added to the Program Menu folder for the current user, the ApplicationProgramsFolder reference is used later in the script when setting up the start menu items.

Updating an XML File

It is possible to use components to action additional steps and tie the KeyPath to the containing directory structure. The KeyPath is used by the installer to determine if an item exists so if the containing directory structure exists the actions do not run. In my sample the red comment above is a place holder for a couple of components similar to.

<Component Id=”cmpConfigEnvironmentName” Guid=”????” KeyPath=”yes”>
<util:XmlFile Id=”xmlConfigEnvironmentName”
Action=”setValue”
ElementPath=”/configuration/appSettings/add[\[]@key=’EnvironmentName'[\]]/@value”
File=”[INSTALLLOCATION]\ExpertAssistantCO.exe.config”
Value=”[EXPERTENVIRONMENTNAME]”
/>
</Component>

The component is responsible for updating the ExpertAssistant.exe.config Xml file with a property from the MSI. The util extension library provides a XmlFile function which can read and write to a specified Xml file. The element path is a formatted field and therefore, square brackets in the XPath must be escaped. We have three updates to the exe.config to make and so end up with three components, for ease of management these are then wrapped in a ComponentGroup:

<ComponentGroup Id=”ExpertAssistantCO.ConfigSettings”>
  <ComponentRef Id=”cmpConfigEnvironmentName”/>
  <ComponentRef Id=”cmpConfigExpertSharePath”/>
  <ComponentRef Id=”cmpConfigLocalInstallationPath”/>
</ComponentGroup>

Adding a Start Menu Item

A common requirement is to add a shortcut for the installed application to the Start Menu. There is an odd twist here as we are using a perUser install. The StartMenu item is unique to each user installing the software and therefore a registry key is required to track the KeyPath. The registry key must be in the HKEY_CURRENT_USER hive and a logical location is Software\VendorName\ApplicationName\.

<DirectoryRef Id=”ApplicationProgramsFolder”>
  <Component Id=”ApplicationShortcut” Guid=”????” >
    <Shortcut Id=”ApplicationStartMenuShortcut”
       Name=”Expert Assistant”
       Description=”Expert Assistant”
       Target=”[INSTALLLOCATION]\ExpertAssistantCO.exe”
       />
    <RegistryValue Root=”HKCU” Key=”Software\Aderant\ExpertAssistant_[EXPERTENVIRONMENTNAME]” Name=”installed” Type=”integer” Value=”1″ KeyPath=”yes”/>
    <RemoveFolder Id=”ApplicationProgramsFolder” On=”uninstall”/>
  </Component>
</DirectoryRef>

Along with the Shortcut, we also tie a RemoveFolder action to the registry KeyPath so that the folder containing the shortcut is removed during an uninstall.

Remove Custom Registry Key On Uninstall

It is possible to have specific actions occur only during an uninstall to clean up, we have this need to remove a registry key that maybe set-up by the application. To achieve this we schedule a Registry action to ‘removeKeyOnUninstall’. Again, this action is perUser and therefore tied to a KeyPath in the HKEY_CURRENT_USER registry hive.

<DirectoryRef Id=”ApplicationProgramsFolder”>
  <Component Id=”RemoveRunRegistryEntry” Guid=”????”>
    <RegistryValue Root=”HKCU” Key=”Software\Microsoft\Windows\CurrentVersion\Run” Name=”ADERANT.ExpertAssistant” KeyPath=”yes” Type=”string” Value=””/>
    <Registry Action=”removeKeyOnUninstall” Root=”HKCU” Key=”Software\Microsoft\Windows\CurrentVersion\Run\ADERANT.ExpertAssistant” />
  </Component>
</DirectoryRef>

Launch an Exe after Installation

After the installation or repair of the MSI is complete, we’d like the MSI to run the executable that we’ve just installed on to the machine. To do this we need to invoke a custom action.

<CustomAction Id=”LaunchApplication” BinaryKey=”WixCA” DllEntry=”WixShellExec” Impersonate=”yes” />

The custom action executes the command held in the WixShellExecTarget property that we specified near the beginning of the wxs file. The custom action then needs to be scheduled to run after InstallFinalize:

<InstallExecuteSequence>
  <Custom Action=”LaunchApplication” After=”InstallFinalize” >NOT(REMOVE ~=”ALL”)</Custom>
</InstallExecuteSequence>

In our case we don’t want the action to execute if we are removing the software, only on install and repair. Therefore we specify the condition ‘NOT(REMOVE ~=”ALL”)’, more details can be found here.

NOTE: Before setting this condition, the entry in the Add Remove Programs control panel would not automatically be deleted on uninstall, it would only disappear after a manual refresh. If the uninstall process returns a code other than 0, an error has occurred and so the refresh is not triggered. To see this was the case, I enabled verbose logging via msiexec and removed the MSI using the command line. The log showed that the custom action was failing because the path didn’t exist – because we had just removed it. The non-zero return code was logged.

Pulling It All Together

The final part of the script declares a feature – an installable unit. In our case we have a single feature which installs everything.

    <Feature Id=”ExpertAssistant”
             Title=”Expert Assistant”
             Level=”1″>
      <ComponentGroupRef Id=”ExpertAssistantCO.Binaries” />
      <ComponentGroupRef Id=”ExpertAssistantCO.Content” />
      <ComponentGroupRef Id=”ExpertAssistantCO.ConfigSettings” />
      <ComponentRef Id=”ApplicationShortcut” />
      <ComponentRef Id=”RemoveRunRegistryEntry” />
    </Feature>
  </Product>
</Wix>

Here the various component groups we’ve declared come into play, rather than listing out every feature individually we can reference the logical component group.

And we are done. We don’t require a UI for our installer and so I’ve not looked into that in any depth. WiX does fully support defining an installation wizard UI and even supports custom UI.

The last piece of the WiX tooling is the Deployment Foundation Toolkit which I’ll save for the next post.

Full product.wxs script for reference (with the GUIDs taken out) to close…

<?xml version=”1.0″ encoding=”UTF-8″?>
<Wix xmlns=”
http://schemas.microsoft.com/wix/2006/wi” xmlns:util=”http://schemas.microsoft.com/wix/UtilExtension” RequiredVersion=”3.5.0.0″>
  <Product Id=”?”
           Name=”ExpertAssistant”
           Language=”1033″
           Codepage=”1252″
           Version=”8.0.0.0″
           Manufacturer=”Aderant”
           UpgradeCode=”?”>
    <Package InstallerVersion=”200″
             Compressed=”yes”
             Manufacturer=”Aderant”
             Description=”Expert Assistant Installer”
             InstallScope=”perUser”
    />

    <Property Id=”EXPERTSHAREPATH” Value=”\\MyShare\ExpertShare” />
    <Property Id=”EXPERTENVIRONMENTNAME” Value=”MyEnvironment” />
    <Property Id=”EXPERTLOCALINSTALLPATH” Value=”C:\AderantExpert\Environment\Applications” />
    <Property Id=”ARPPRODUCTICON” Value=”icon.ico” />
    <Property Id=”ARPNOMODIFY” Value=”1″ />
    <Property Id=”WixShellExecTarget” Value=”[#filExpertAssistantCOexe]”/>

    <SetProperty Id=”dirEnvironmentFolder” Value=”C:\AderantExpert\[EXPERTENVIRONMENTNAME]” After=”CostInitialize”/>
    <SetProperty Id=”EXPERTLOCALINSTALLPATH” Value=”C:\AderantExpert\[EXPERTENVIRONMENTNAME]\Applications” After=”CostInitialize” />
   
    <Property Id=”EnableUserControl” Value=”1″ />

    <Icon Id=”icon.ico” SourceFile=”$(var.ExpertAssistantCO.TargetDir)\Expert_Assistant_Icon.ico”/>

    <Media Id=”1″ Cabinet=”media1.cab” EmbedCab=”yes” />

    <Directory Id=”TARGETDIR” Name=”SourceDir”>
      <Directory Id=”dirAderant” Name=”AderantExpert”>
        <Directory Id=”dirEnvironmentFolder” Name=”[EXPERTENVIRONMENTNAME]” >
          <Directory Id=”INSTALLLOCATION” Name=”ExpertAssistantInstaller”>
            <Component Id=”cmpConfigEnvironmentName” Guid=”?” KeyPath=”yes”>
              <util:XmlFile Id=”xmlConfigEnvironmentName”
                            Action=”setValue”
                            ElementPath=”/configuration/appSettings/add[\[]@key=’EnvironmentName'[\]]/@value”
                            File=”[INSTALLLOCATION]\ExpertAssistantCO.exe.config”
                            Value=”[EXPERTENVIRONMENTNAME]”
                            />
            </Component>
            <Component Id=”cmpConfigExpertSharePath” Guid=”?” KeyPath=”yes”>
              <util:XmlFile Id=”xmlConfigExpertSharePath”
                            Action=”setValue”
                            ElementPath=”/configuration/appSettings/add[\[]@key=’ExpertSharePath'[\]]/@value”
                            File=”[INSTALLLOCATION]\ExpertAssistantCO.exe.config”
                            Value=”[EXPERTSHAREPATH]”
                            />
            </Component>
            <Component Id=”cmpConfigLocalInstallationPath” Guid=”?” KeyPath=”yes”>
              <util:XmlFile Id=”xmlConfigLocalInstallationPath”
                            Action=”setValue”
                            ElementPath=”/configuration/appSettings/add[\[]@key=’LocalInstallationPath'[\]]/@value”
                            File=”[INSTALLLOCATION]\ExpertAssistantCO.exe.config”
                            Value=”[EXPERTLOCALINSTALLPATH]”
                            />
            </Component>
          </Directory>
          <Directory Id=”ProgramMenuFolder”>
            <Directory Id=”ApplicationProgramsFolder” Name=”Aderant”>
            </Directory>
          </Directory>
        </Directory>
      </Directory>
    </Directory>

    <ComponentGroup Id=”ExpertAssistantCO.ConfigSettings”>
      <ComponentRef Id=”cmpConfigEnvironmentName”/>
      <ComponentRef Id=”cmpConfigExpertSharePath”/>
      <ComponentRef Id=”cmpConfigLocalInstallationPath”/>
    </ComponentGroup>

    <DirectoryRef Id=”ApplicationProgramsFolder”>
      <Component Id=”ApplicationShortcut” Guid=”?” >
        <Shortcut Id=”ApplicationStartMenuShortcut”
           Name=”Expert Assistant”
           Description=”Expert Assistant”
           Target=”[INSTALLLOCATION]\ExpertAssistantCO.exe”
           />
        <RegistryValue Root=”HKCU” Key=”Software\Aderant\ExpertAssistant_[EXPERTENVIRONMENTNAME]” Name=”installed” Type=”integer” Value=”1″ KeyPath=”yes”/>
        <RemoveFolder Id=”ApplicationProgramsFolder” On=”uninstall”/>
      </Component>
    </DirectoryRef>

    <DirectoryRef Id=”ApplicationProgramsFolder”>
      <Component Id=”RemoveRunRegistryEntry” Guid=”?”>
        <RegistryValue Root=”HKCU” Key=”Software\Microsoft\Windows\CurrentVersion\Run” Name=”ADERANT.ExpertAssistant” KeyPath=”yes” Type=”string” Value=””/>
        <Registry Action=”removeKeyOnUninstall” Root=”HKCU” Key=”Software\Microsoft\Windows\CurrentVersion\Run\ADERANT.ExpertAssistant” />
      </Component>
    </DirectoryRef>
   
    <CustomAction Id=”LaunchApplication” BinaryKey=”WixCA” DllEntry=”WixShellExec” Impersonate=”yes” />
    <InstallExecuteSequence>
      <Custom Action=”LaunchApplication” After=”InstallFinalize” >NOT(REMOVE ~=”ALL”)</Custom>
    </InstallExecuteSequence>

    <Feature Id=”ExpertAssistant”
             Title=”Expert Assistant”
             Level=”1″>
      <ComponentGroupRef Id=”ExpertAssistantCO.Binaries” />
      <ComponentGroupRef Id=”ExpertAssistantCO.Content” />
      <ComponentGroupRef Id=”ExpertAssistantCO.ConfigSettings” />
      <ComponentRef Id=”ApplicationShortcut” />
      <ComponentRef Id=”RemoveRunRegistryEntry” />
    </Feature>
  </Product>
</Wix>

WiXing Lyrical (part 1)

Continuing on from the previous post, it’s time to take a look at the customization requirements that brought about the creation of a custom bootstrap process for our desktop installations.

The customization capabilities within the Expert product are extensive, they support changes to the  domain model, business process and user interface. Many of these changes result in the need to deploy custom assemblies to the workstations running the Expert applications. If the out-of-the-box ClickOnce manifests were used to manage these changes, they would need to be updated by the customization process. Instead of doing this, we chose a solution similar to Google Chrome and created our own bootstrap mechanism to manage updating the client software. The ClickOnce infrastructure is used to ‘install an installer’. I’m not going to drill into the bootstrapper, Pete has already discussed some of the performance aspects here. Instead we’ll walk through the process of creating an MSI to replace the ClickOnce based installation.

This was not my first MSI authoring, in the past I’d been exposed to InstallShield, Wise and WiX, but I hadn’t done anything in the area for around 4-5 years. The last installer I wrote was using Windows Installer Xml (WiX) when it had just been publicly released from Microsoft and the memory was not a pleasant one. The good news is that in the intervening years, my biggest issue with WiX has been resolved – there is now good documentation and a healthy community supporting it. Rather than waiting until the end to list a couple of resources, here are the main references I used:

The first thing to note is that WiX is a free, open source toolkit that is fully supported by Microsoft. It does not ship with any Visual Studio version and must be downloaded. The current version, and the version I used, is v3.5 though there is a v3.6 RC0 available. The actual download of the bits is available from CodePlex here, the SourceForge site links to this.

There are three components in the installer:

  1. WiX – command line tools, Xml schemas, extensions
  2. Votive – a Visual Studio plug-in
  3. Deployment Tools Foundation (DTF) – a managed library for programming against MSIs.

In addition to the WiX Toolkit, another tool to have is Orca which is available in the Windows SDK. Orca is an editor for the MSI database format, allowing an MSI to be easily inspected and edited.

The WiX toolset is summarized concisely by the following diagram (taken from http://wix.sourceforge.net/coretoolset.html)

clip_image001

While it is possible to work directly from the command line, the Visual Studio integration is a compelling option. While the Extension Manager Online gallery contains a WiX download:

image

This did not work for me. Instead I downloaded and installed the MSI from the CodePlex site.

Votive, the Visual Studio plug-in, encourages making the installer part of your solution. It adds a number of project types to the product:

image

You can add the set-up project alongside the project containing the source code and maintain the whole solution together – installation should not be a last minute scramble.

image

Getting started is straightforward, you just add a reference in your set-up project to the project containing the application that you want to install. In our case, we want to install the bootstrapper contained in the ExpertAssistantCO project:

image

The set-up project is configured out of the box to generate a couple of WXS files for you based on the VS project file. The command line tool HEAT can create a WXS file from a number of different sources including a directory, VS project or an existing MSI. To enable HEAT, set the Harvest property to true and this will re-create the WXS files on each build based upon the project file. By simply adding a project reference to the set-up project you will have a MSI on the next solution compile. The intermediary files can be found by choosing to show all files in the Solution Explorer:

image

The obj/Debug subfolder will contain the generated wxs file and the wixobj files compiled from them. The bin\Debug subfolder is the default location for the MSI. The two files of interest are the ExpertAssisantCO.wxs, which contains the files from the referenced ExpertAssistantCO project and the Product.wxs which contains configuration information for the installation process. Building the project will invoke the WiX tooling: candle, preprocesser that transforms .wix into .wixobj, and light, processes wixobj files to create an MSI.

Of course, the out-of-the-box experience can only go so far and so the generated WXS likely needs to be augmented. Our approach was to use HEAT (via the Harvest option) to generate the initial WXS files and then the generation was disabled. The ExpertAssistantCO.wxs file was moved into the project for manual editing and the product.wxs file contains the bulk of the custom code.

The ExpertAssistantCO.wxs contains the list of files involved in the project, this includes source files, built files and documentation. Each file is wrapped in a separate Fragment and given a unique component Id:

<Fragment>
<DirectoryRef Id=”INSTALLLOCATION”>
<Component Id=”cmpExpertAssistantCOexe”
Guid=”????????-????-????-????-????????????” KeyPath=”yes”>
<File Id=”filExpertAssistantCOexe” Source=”$(var.ExpertAssistantCO.TargetDir)\ExpertAssistantCO.exe” />
</Component>
</DirectoryRef>
</Fragment>

The generated code has been changed to specify an explicit GUID and to set the KeyPath attribute. The actual GUID has been replaced with ?s, the KeyPath attribute is used to determine if the component already exists – more here. The shouting INSTALLLOCATION is an example of a public property, in the MSI world public properties are declared in full uppercase. The directory the file will be installed into is declared in the product.wxs file and referenced here. The $(var.ExpertAssistantCO.TargetDir) demonstrates a pre-processor directive that allows VS solution properties to be accessed, in this case to determine the source location of the file.

Components can be grouped together to provide more manageable units, for example:

<Fragment>
<ComponentGroup Id=”ExpertAssistantCO.Binaries”>
<ComponentRef Id=”cmpExpertAssistantCOexe” />
<ComponentRef Id=”cmpICSharpCodeZipLib” />
<ComponentRef Id=”cmpAderantDeploymentClient”/>
</ComponentGroup>
</Fragment>

The generated referencedProject.wxs file contains each file declared within a component and then logical groupings for the components. The more interesting aspects of WiX belong to the product.wix file. This is where registry keys, short cuts, remove actions and other items are set-up.

On to the product.wix then and the first line:

<Wix xmlns=”http://schemas.microsoft.com/wix/2006/wi”
xmlns:util=”
http://schemas.microsoft.com/wix/UtilExtension”
RequiredVersion=”3.5.0.0″>

Here we are referencing two namespaces, the default namespace is the standard WiX schema and the second util namespace enables the use of a WiX extension library. Extension libraries contain additional functionality usually grouped by a common thread. The library needs to be added as a project reference:

image

Available extension libraries can be found in C:\Program Files (x86)\Windows Installer XML v3.5\bin :

image

A drill-down into the various extension schemas is provided here. The utility extension referenced above allows Xml file manipulation which we will see later. The requiredVersion sets the version of WiX we are depending on to compile the file.

Next we define the product:

<Product Id=”????????-????-????-????-????????????”
Name=”ExpertAssistant”
Language=”1033″
Codepage=”1252″
Version=”8.0.0.0″
Manufacturer=”Aderant”
UpgradeCode=”????????-????-????-????-????????????”>

The GUIDs are used to uniquely identify the product installer and so you want to ensure you create a valid GUID using tooling such as GuidGen.exe. Following the product, we define the package:

<Package InstallerVersion=”200″
Compressed=”yes”
Manufacturer=”Aderant”
Description=”Expert Assistant Installer”
InstallScope=”perUser”
/>

The attribute worth calling out here is the InstallScope. This can be set to perMachine or perUser, setting to perMachine requires elevated privileges to install. We want to offer an install to all users without requiring elevated privilege and so have a per user install. This has implications later on when we have to set-up user specific items such as Start Menu shortcuts.

Next we move onto properties:

<!– Properties –>
<Property Id=”EXPERTSHAREPATH” Value=”\\MyShare\ExpertShare” />
<Property Id=”EXPERTENVIRONMENTNAME” Value=”MyEnvironment” />
<Property Id=”EXPERTLOCALINSTALLPATH” Value=”C:\AderantExpert\” />

<Property Id=”ARPPRODUCTICON” Value=”icon.ico” />
<Property Id=”ARPNOMODIFY” Value=”1″ />
<Property Id=”WixShellExecTarget” Value=”[#filExpertAssistantCOexe]”/>

The first three properties are custom public properties defined for this installer, public properties must be declared all upper case. A public property can be provided on the msiexec command line or via an MST file to customize the property value.

The properties with a prefix of ARP relate to the Add Remove Programs control panel, now Programs and Features in Windows 7. The ARPPRODUCTICON is used to set the icon that appears in the installed programs list. The ARPNOMODIFY property removes the Change option from the control panel options:

image

In contrast, Visual Studio SP1 supports the Change option:

image

Other ARP properties can be found here.

The final property WixShellExecTarget specifies the file to be executed when the install completes. This is a required parameter of a custom action that we will come to later. The [#filExpertAssistantCOexe] is a reference to a file declared in the ExpertAssistantCO.wxs file.

<File Id=”filExpertAssistantCOexe” Source=”$(var.ExpertAssistantCO.TargetDir)\ExpertAssistantCO.exe” />

Next up we come to one of the areas that stumped me for a while, how to set a property value. Some attributes can directly reference a property by surrounding the property name in [] and have the value swapped in, e.g.

<Directory Id=”dirEnvironmentFolder” Name=”[EXPERTENVIRONMENTNAME]” >

However this is not supported when setting properties, therefore the following does not result in substitution:

<Property Id=”Composite” Value=”[PROPERTY1] and [PROPERTY2]” />

Instead the SetProperty element is used:

<!– Set-up environment specific properties–>
<SetProperty Id=”dirEnvironmentFolder” Value=”C:\AderantExpert\[EXPERTENVIRONMENTNAME]” After=”CostInitialize”/>
<SetProperty Id=”EXPERTLOCALINSTALLPATH” Value=”C:\AderantExpert\[EXPERTENVIRONMENTNAME]\Applications” After=”CostInitialize” />

When setting the property, the appropriate time to perform the action needs to be set using either the Before or After attribute. This injects the action into the appropriate place in the list of actions to perform. To determine the order, I used Orca to view the InstallExecuteSequence:

image

A final property that is set is the EnableUserControl, which allows the installer to pass all public properties to the server side during a managed install.

<Property Id=”EnableUserControl” Value=”1″ />

Note: the preferred approach is to set the Secure attribute individually to Yes on each property declaration that supports user control (I have only just learnt this while writing up the posting).

A final element for this post is Icon which specifies an icon file.

<Icon Id=”icon.ico” SourceFile=”$(var.ExpertAssistantCO.TargetDir)\Expert_Assistant_Icon.ico”/>

The icon Id was used by the ARPPRODUCTICON to set the icon seen in the install programs control panel.

There’s more to come, however this post has become long enough in its own right. In the next post I’ll drill into setting registry keys, determining the install location, Start Menu settings and more.

So far we’ve walked through the following WiX code:

<?xml version=”1.0″ encoding=”UTF-8″?>
<Wix xmlns=”
http://schemas.microsoft.com/wix/2006/wi” xmlns:util=”http://schemas.microsoft.com/wix/UtilExtension” RequiredVersion=”3.5.0.0″>
<Product Id=”????????-????-????-????-????????????”
Name=”ExpertAssistant”
Language=”1033″
Codepage=”1252″
Version=”8.0.0.0″
Manufacturer=”Aderant”
UpgradeCode=”????????-????-????-????-????????????”>
<Package InstallerVersion=”200″
Compressed=”yes”
Manufacturer=”Aderant”
Description=”Expert Assistant Installer”
InstallScope=”perUser”
/>

    <!– Public Properties –>
<Property Id=”EXPERTSHAREPATH” Value=”\\MyShare\ExpertShare” />
<Property Id=”EXPERTENVIRONMENTNAME” Value=”MyEnvironment” />
<Property Id=”EXPERTLOCALINSTALLPATH” Value=”C:\AderantExpert\Environment\Applications” />
<Property Id=”ARPPRODUCTICON” Value=”icon.ico” />
<Property Id=”ARPNOMODIFY” Value=”1″ />
<Property Id=”WixShellExecTarget” Value=”[#filExpertAssistantCOexe]”/>

    <!– Set-up environment specific properties–>
<SetProperty Id=”dirEnvironmentFolder” Value=”C:\AderantExpert\[EXPERTENVIRONMENTNAME]” After=”CostInitialize”/>
<SetProperty Id=”EXPERTLOCALINSTALLPATH” Value=”C:\AderantExpert\[EXPERTENVIRONMENTNAME]\Applications” After=”CostInitialize” />

<!– All users to access the properties, not just elevated users–>
<Property Id=”EnableUserControl” Value=”1″ />

    <!– Icons –>
<Icon Id=”icon.ico” SourceFile=”$(var.ExpertAssistantCO.TargetDir)\Expert_Assistant_Icon.ico”/>
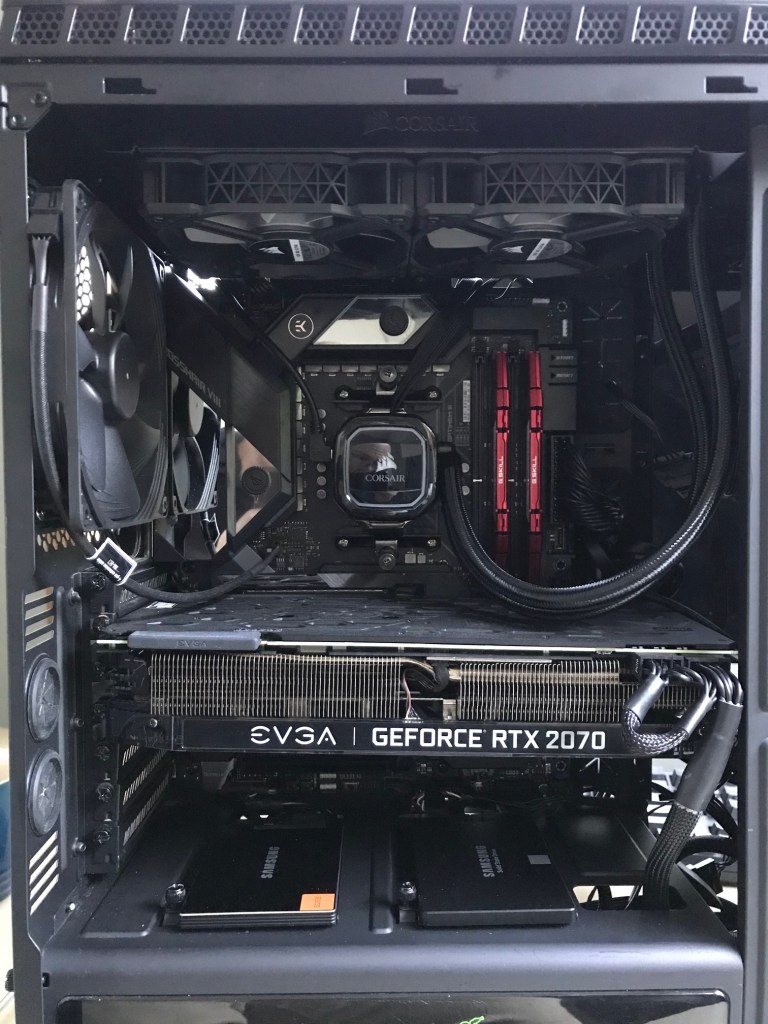
Deploying Desktop Applications

Over the last couple of weeks I’ve been re-examining the desktop deployment strategy we have for Aderant applications. This installer navel gazing has resulted in augmenting our existing ClickOnce based approach with an MSI. The next couple of blog posts will drill into my ClickOnce headaches and my embracing of WiX to create MSIs.

Desktop Deployment Challenges

During the first steps into the new millennium, rich/smart/fat client applications which install binary files onto the local host fell out of fashion in the face of the centralized web deployment model. Deploying desktop applications was a delicate process: prior to the world of managed code, COM applications roamed the world and brought with them the plague of ‘DLL Hell’. Installing a new piece of software into a Windows environment could very well result in previously stable applications breaking, registries full of COM ClassIDs could become corrupt and the use of regedit and regsvr32 became almost accepted mainstream tools. The Microsoft .NET framework worked very hard overcome the fragility of the COM world but introduces its own complexities: managing versions, the global assembly cache, shadow copies and so on. Regardless of the technology, the software must be rolled out to each individual desktop and managed on each desktop. Installer technology supported the concept of repair but did not support automatic upgrades; additionally the installer often required administrator privileges to install.

A Mexican stand-off ensued: desktop applications allowed richer user experiences, a simpler programming model and the ability to run independently of a network connection; web applications have a much simpler deployment model and updates.

Of course, it is quite natural to want the best of both worlds and so various approaches have evolved to try to satisfy this, one of these approaches is ClickOnce.

Microsoft ClickOnce

As part of the .NET v2 framework, Microsoft introduced a new deployment option for desktop applications called ClickOnce. The goals of ClickOnce are to solve the following three major issues:

  1. Difficulty updating a deployed application
  2. Impact of the application on the users’ desktop
  3. Administrator privileges required to install apps

Conceptually, ClickOnce provides a central deployment model for desktop applications which does not require the installing user to have elevated privileges. It supports both the automatic repair and upgrading of applications and supports the use of an HTTP channel to distribute the installer. This last point is a game changer – desktop applications could now be installed and updated over HTTP on port 80, not requiring any additional firewall exceptions. This allows ClickOnce to be used to deploy applications over the internet as well as a corporate network. A couple of high profile, non-Microsoft examples of ClickOnce adoption demonstrates an industry acceptance: Google Chrome and Join.Me.

Corporate vs. Internet Installation

The ability to distribute software over the internet is something of a double edged sword should you choose to use ClickOnce to distribute software within a corporate network. The internet is untrustworthy, therefore mechanisms are required within ClickOnce to establish trust. These mechanisms are on by default and some cannot be switched off. To discuss some of these first requires an understanding of how an application is deployed via ClickOnce.

A ClickOnce deployment is basically managed by two XML files called manifests. There is an application manifest (.manifest) and a publisher manifest (.application). There’s the first annoyance – the application manifest does not have the .application file extension, which is so confusing. The application manifest contains a description of the files to be deployed and other settings that are controlled by the author of the application. The publisher manifest points to the application manifest, and contains information that is pertinent to the firm installing the application such as the publisher Url, update policy and the minimum required version. Each manifest is by default tamper proof, the manifests include a hash so that they cannot be altered without the use of appropriate tools such as the Manifest Generation and Editing Tool(mage.exe) – note: changing the application manifest invalidates the publisher manifest. It is possible to remove the hash from individual files within the manifest. The tamper proofing is only part of the trust story, you also need to be able to trust that the install comes from a trusted application vendor and that is was installed from a trusted publisher. Identity on the internet is established using certificates and so both of the manifests can be signed using a Code Signing certificate as evidence.

Time for the second annoyance… to install a ClickOnce application silently requires that both the manifests are signed using a certificate that is trusted as a software publisher by the machine undertaking the installation. This is a serious pain for ISVs. In our case, we can signed the application manifest with our company certificate and indeed should do so. However, if one of the manifests is signed then the other must also be signed, therefore the publisher manifest must be signed. The publisher of the application is the firm installing our software and so they must have a code signing certificate and ensure that the certificate is trusted by each desktop machine. If you choose to sign neither manifest, the installing user will see a security dialog window asking them if they trust the publisher and location – most corporate users will not know what they are being asked.

An additional step in the trust process is ensuring that the publisher URL belongs to the Trusted Site  (or Local Intranet Site) security zone of IE.

All of this protection makes sense for internet deployments but less so for intranet deployments within a corporate network which is implicitly trusted.

While the silent install is possible, if somewhat complex, a silent remove is not supported, the user will always be prompted to confirm the removal of the application. This single anomaly causes a great deal of frustration within the firms we provide software too. It is possible to achieve an automated uninstall but it requires the use of some nasty automation code:

On Error Resume Next
Set objShell = WScript.CreateObject(“WScript.Shell”)
objShell.Run “taskkill /f /im [your app process name]*”
objShell.Run “[your app uninstall key]”
Do Until Success = True
Success = objShell.AppActivate(“[your window title]”)
Wscript.Sleep 200
Loop
objShell.SendKeys “OK”

This VBScript snippet was taken from:http://social.msdn.microsoft.com/Forums/en-US/winformssetup/thread/51a44139-2477-4ebb-8567-9189063cf340/. The app uninstall key will be found in the registry:

image

Why am I so down on this? ClickOnce is a pull installation, it is expected that a user will choose to install the software. This is not so often the case within a corporate environment with a locked down desktop – applications are pushed to users using management software such as System Center Configuration Manager or via Active Directory group policies.

Additional Headaches

Beyond the heartache to perform a silent install and remove of the application, there are some other pain points of note.

ClickOnce and Citrix don’t mix well. ClickOnce permits installs by a non-privileged user, to do so the application is installed into the users local profile, this means on a Citrix environment each user has a separate install of the software taking up disk space.

The path of the application is a monster too, for example the Join.Me installer placed the files into:

C:\Users\username\AppData\Local\Apps\2.0\1A6OWNZM.ETC\EEWH8699.6PL\join..tion_43a0dbe7f0f75062_0001.0000_9871fcdc8aa605d7

If you have either long filenames or a deep file hierarchy, you can run out of characters for your file paths (260 character limit).

ClickOnce does not provide any extensibility points to run custom pre or post deployment actions.

In our particular case, we need to deploy assemblies to the application after the initial installation due to on-site firm customizations. ClickOnce does have a self-updating capability but we needed something more dynamic – more on this later…

In Defence of ClickOnce

This has been a rather negative look at ClickOnce so far so I do feel the need to provide some positive balance. ClickOnce is great at deploying apps over HTTP, it provides a self-repair and self-updating installer, it allows non-admin users to install software safely, it goes to great lengths to ensure the software you install can be trusted.

The case for ClickOnce was strong enough that we’ve used it for the Aderant Golden Gate desktop applications. The negatives are from unusual customization scenarios and field experience within corporate networks which has lead to the investigation into a MSI centric approach.

If you are pursuing a ClickOnce installer and need to dig a little deeper than the VS2010 template, I  strongly recommend getting Brian Noyes book: http://www.amazon.com/Smart-Client-Deployment-ClickOnce-Applications/dp/0321197690.

In the next post, I’ll discuss our customization requirements that lead to using ClickOnce to install a bootstrapper.

New Virtual Home

Welcome to my new home, within the year I’ll be evicted from Apples MobileMe hosting and so I’m forced to relocate.

The goal of this blog continues on from where the previous finished, to post about the Microsoft technology stack, in particular the .NET platform. Most of the content falls out of my day job as a software architect for ADERANT and hopefully will be of use to the Microsoft community. The initial set of postings will be a clean up and summary of content from my current blog. WordPress looks to have a host of features that MobileMe did not and so I look forward to playing around with the new platform too.

Creating a generic ping proxy

In the previous post we walked through the steps required to implement a service monitoring ‘Ping’ operation as a WCF endpoint behavior. This allows us to add the ping functionality to an endpoint using WCF configuration alone. Following on from this, here’s a generic implementation of a Http proxy class to call Ping on any service.

Last time we left off having created a proxy to a test service using the WcfTestClient application.

Ping operation from metadata in the WCF Test Client

Switching to the XML view lets us see the SOAP request and reply message for a ping.

<s:Envelope xmlns:s="http://schemas.xmlsoap.org/soap/envelope/">
  <s:Header>
    <Action s:mustUnderstand="1" xmlns="http://schemas.microsoft.com/ws/2005/05/addressing/none">http://aderant.com/expert/contract/TestServiceContract/IService1/Ping</Action>
  </s:Header>
  <s:Body>
    <Ping xmlns="http://aderant.com/expert/contract/TestServiceContract" />
  </s:Body>
</s:Envelope>

and the response:

<s:Envelope xmlns:s="http://schemas.xmlsoap.org/soap/envelope/">
  <s:Header />
  <s:Body>
    <PingResponse xmlns="http://aderant.com/expert/contract/TestServiceContract">
      <PingResult>2011-10-18T01:28:57.0222683Z</PingResult>
    </PingResponse>
  </s:Body>
</s:Envelope>

The namespace highlighted in green is the namespace we gave to our service as part of its ServiceContract attribution:

[ServiceContract(Namespace="http://aderant.com/expert/contract/TestServiceContract")]
public interface IService1 {

The SOAP message varies from service to service according to the namespace of the contract and the type of the contract. If we know these two values then we can construct the appropriate SOAP message for a generic client.

private static void CallWcfServiceUsingGenericProxy() {
    const string address = @"http://localhost/TestService/Service1.svc";
    const string serviceContractType = "IService1";
    const string serviceContractNamespace = @"http://aderant.com/expert/contract/TestServiceContract";
    Console.WriteLine("Pinging WCF service using the generic proxy...");
    DateTime utcStart = DateTime.UtcNow;
    string response = PingService(serviceContractType, serviceContractNamespace, address);
    DateTime utcFinished = DateTime.UtcNow;
    DateTime serverPingTimeUtc = ProcessPingResponse(response, serviceContractNamespace);
    WriteTimingMessage(utcStart, serverPingTimeUtc, utcFinished);
}

The calling of the generic proxy is separated from the processing of the response so that a timing can be made around just the communication.

private static string PingService(string serviceContractType, string contractNamespace, string address) {
    string pingSoapMessage = string.Format(@"", contractNamespace);
    if (!contractNamespace.EndsWith("/")) { contractNamespace = contractNamespace + "/";}
    WebClient pingClient = new WebClient();
    pingClient.Headers.Add("Content-Type", "text/xml; charset=utf-8");
    pingClient.Headers.Add("SOAPAction", string.Format(@"""{0}{1}/Ping""", contractNamespace, serviceContractType));
    string response = pingClient.UploadString(address, pingSoapMessage);
    return response;
}

To Ping the service, we construct the SOAP message and use a WebClient to make the call. The web client requires headers to be added for the content type and the SOAPAction which tells the WCF Dispatcher which method we want to call.

To process the SOAP message returned from the Ping message we use:

private static DateTime ProcessPingResponse(string response, string contractNamespace) {
    XDocument responseXml = XDocument.Parse(response);
    XElement pingTime = responseXml.Descendants(XName.Get("PingResult", contractNamespace)).Single();
    DateTime serverPingTimeUtc = DateTime.Parse(pingTime.Value).ToUniversalTime();
    return serverPingTimeUtc;
}

Now we have the UTC DateTime from the server when it processed the response.

All good, if we know the contract namespace and interface type for the service we can ping it. As we saw, this information is attributed on the service contract class. To simplify the proxy code a little, we can use reflection to determine this information given just the contract type.

public class WcfServicePinger<TServiceContract> where TServiceContract : class {
    public DateTime Ping(string addressUri) {
        string @namespace = string.Empty;
        ServiceContractAttribute attribute = typeof(TServiceContract)
            .GetCustomAttributes(typeof(ServiceContractAttribute), true)
            .FirstOrDefault() as ServiceContractAttribute;
        if(attribute == null) {
            throw new ArgumentException("The specified type {0} is not a WCF service contract.", typeof(TServiceContract).Name);
        }
        if(string.IsNullOrWhiteSpace(attribute.Namespace)) {
            @namespace = "http://tempuri.org";
        } else {
            @namespace = attribute.Namespace;
        }
        return new WcfServicePinger().Ping(addressUri, typeof(TServiceContract).Name, @namespace);
    }
}

The non-generic WcfServicePinger calls our previous code, as above:

public class WcfServicePinger {
    public DateTime Ping(string addressUri, string serviceContractTypename, string serviceContractNamespace) {
        string response = PingService(serviceContractTypename, serviceContractNamespace, addressUri);
        DateTime serverPingTimeUtc = ProcessPingResponse(response, serviceContractNamespace);
        return serverPingTimeUtc;
    }

So in the end we would use:

DateTime serverTime = new WcfServicePinger<IService1>().Ping(“http://localhost/TestService/Service1.svc”);

Note that we have constructed a generic proxy that calls an Http endpoint. I did try to construct a net.tcp generic proxy class too but it broke my time box. The Ping method can be called via net.tcp using a proxy generated from the endpoint metadata.

Checking WCF Service Availability using an Endpoint Behavior

A common operational requirement for an SOA is the ability to determine if a service is available. Just as it is common to ping a machine, we also want to be able to ping an individual service to determine that it is running and able to respond to messages.

Our first pass at solving this issue was to introduce an IPingable interface that each of our service facades would implement. The code was pushed into our service base class and the software factory updated as appropriate. However, this didn’t feel quite right. Other service extensions such as the metadata endpoint were not so invasive, it can be established by a simple addition to the service configuration file. We felt we wanted the same configurable nature for a ping mechanism and so set out to figure out how to create a custom WCF behavior.

This post walks through the creation of a WCF Endpoint Behavior which will add a Ping() method to a service. The method returns the DateTime, in UTC, stating when the server processed the request. This can be used to establish how long a basic roundtrip to the service is taking for both the request and the reply. The use of an endpoint behavior allows us to add this functionality to any service, therefore we can add it retrospectively to services that we have already created without needing to change them.

The source code for this post is available from my DropBox.

Let’s start by looking at how we would configure such an endpoint behavior. For an existing service, we would copy the assembly containing the endpoint behavior into the bin folder for the service and then add some entries into the web.config:

<configuration>
    <system.serviceModel>
        <extensions>
            <behaviorExtensions>
                <add name="Ping" type="CustomWcfBehaviors.PingEndpointBehavior, CustomWcfBehaviors" />
            </behaviorExtensions>
        </extensions>
        <behaviors>
            <endpointBehaviors>
                <behavior>
                    <Ping>
                </behavior>
            </endpointBehaviors>
        </behaviors>

We register the type [CustomWcfBehaviors.PingEndpointBehavior in assembly CustomWcfBehaviors] that is our custom behavior as a behavior extension and then declare that we want to use the extension. The configuration above sets up a default behavior that will be applied to all endpoints since we haven’t explicitly named it. That’s it, fetch the metadata for the service it will now contain a Ping() method.

The configuration of the behavior is reasonably straight forward, let’s look at the implementation…

namespace CustomWcfBehaviors {
    public class PingEndpointBehavior: BehaviorExtensionElement, IEndpointBehavior {
    private const string PingOperationName = "Ping";
    private const string PingResponse = "PingResponse";

The behavior needs to derive from BehaviorExtensionElement which allows it to be declared in the service configuration as an extension element. We need to introduce two overrides:

// factory method to construct an instance of the behavior
protected override object CreateBehavior(){
    return new PingEndpointBehavior();
}
// property used to determine the type of the behavior
public override Type BehaviorType{
    get { return typeof(PingEndpointBehavior); }
}

Now onto the real work, the IEndpointBehavior implementation:

public void Validate(ServiceEndpoint endpoint) {}
public void AddBindingParameters(ServiceEndpoint endpoint, BindingParameterCollection bindingParameters) {}
public void ApplyClientBehavior(ServiceEndpoint endpoint, ClientRuntime clientRuntime) {}

public void ApplyDispatchBehavior(ServiceEndpoint endpoint, EndpointDispatcher endpointDispatcher) {
    if(PingOperationNotDeclaredInContract(endpoint.Contract)) {
        AddPingToContractDescription(endpoint.Contract);
    }
    UpdateContractFilter(endpointDispatcher, endpoint.Contract);
    AddPingToDispatcher(endpointDispatcher, endpoint.Contract);
}

There are four methods that we need to implement but only one that we do any work in. The ApplyDispatchBehavior is where we add our code to manipulate how the endpoint invokes the service operations.

Endpoints map to the ABC of WCF [address, binding and contract]. What we want to do is extend the contract with a new service operation. A service host may allow multiple endpoints to expose the service contract on different protocols. For example, we may choose to host our service using both http and net.tcp. If we use IIS as our service host, this is configured via the Advanced Settings… of the Manage Application… context menu option.

The ‘Enabled Protocols’ lists the protocols we want to use. If we have more than one protocol listed then we have to take care that we don’t attempt to add the new Ping operation multiple times to our contract – once per binding type. To check that we haven’t already added the operation we call a small Linq query…

private bool PingOperationNotDeclaredInContract(ContractDescription contract) {
    return ! contract
        .Operations
        .Where(operationDescription =>
            OperationDescription.Name.Equals(PingOperationName,
                StringComparison.InvariantCultureIgnoreCase))
        .Any();
}

If the Ping operation is not found then we need to add it:

private void AddPingToContractDescription(ContractDescription contractDescription) {
    OperationDescription pingOperationDescription = new
    OperationDescription(PingOperationName, contractDescription);
    MessageDescription inputMessageDescription = new MessageDescription(
        GetAction(contractDescription, PingOperationName), MessageDirection.Input);
    MessageDescription outputMessageDescription = new MessageDescription(
        GetAction(contractDescription, PingResponse), MessageDirection.Output);
    MessagePartDescription returnValue = new MessagePartDescription("PingResult",
        contractDescription.Namespace);
    returnValue.Type = typeof(DateTime);
    outputMessageDescription.Body.ReturnValue = returnValue;
    inputMessageDescription.Body.WrapperName = PingOperationName;
    inputMessageDescription.Body.WrapperNamespace = contractDescription.Namespace;
    outputMessageDescription.Body.WrapperName = PingResponse;
    outputMessageDescription.Body.WrapperNamespace = contractDescription.Namespace;
    pingOperationDescription.Messages.Add(inputMessageDescription);
    pingOperationDescription.Messages.Add(outputMessageDescription);
    pingOperationDescription.Behaviors.Add(new DataContractSerializerOperationBehavior(pingOperationDescription));
    pingOperationDescription.Behaviors.Add(new PingOperationBehavior());
    contractDescription.Operations.Add(pingOperationDescription);
}

Here we are creating an OperationDescription to add to our ContractDescription, this adds the operation specification for our Ping operation to the existing contract. The code to execute is encapsulated by the PingOperationBehavior().

public class PingOperationBehavior : IOperationBehavior {
    public void ApplyDispatchBehavior(OperationDescription operationDescription, DispatchOperation dispatchOperation) {
        dispatchOperation.Invoker = new PingInvoker();
    }
    public void Validate(OperationDescription operationDescription) {}
    public void AddBindingParameters(OperationDescription operationDescription, BindingParameterCollection bindingParameters) {}
    public void ApplyClientBehavior(OperationDescription operationDescription, ClientOperation clientOperation) {}
 }

Similar to the endpoint behavior, we need to implement an interface in this case the IOperationBehavior. The method signatures are similar and we need to fill out the ApplyDispatchBehavior method to call an IOperationInvoker to execute our Ping implementation:

internal class PingInvoker : IOperationInvoker {
    public object[] AllocateInputs() {
        return new object[0];
    }
    public object Invoke(object instance, object[] inputs, out object[] outputs) {
        outputs = new object[0];
        return DateTime.UtcNow;
    }
    public IAsyncResult InvokeBegin(object instance, object[] inputs, AsyncCallback callback, object state) {
        throw new NotImplementedException();
    }
    public object InvokeEnd(object instance, out object[] outputs, IAsyncResult result) {
        throw new NotImplementedException();
    }
    public bool IsSynchronous {
        get { return true; }
    }
 }

The ping operation is so simple that there is no asynchronous implementation. All we do is return the current date time on the server in UTC.

So where are we? Well, we’ve added the Ping method to our existing service contract and mapped it to an IOperationBehavior which will dispatch an IOperationInvoker to call the code.

Next up, we have to update the endpoint dispatcher so that it knows what to do if it receives a Ping request message. The endpoint dispatcher maintains a list of actions that it knows how to action. We need to update this list so that it includes our new ping action. To do this we just refresh the action list from the contract description operations:

private void UpdateContractFilter(EndpointDispatcher endpointDispatcher, ContractDescription contractDescription) {
    string[] actions = (from operationDescription in contractDescription.Operations
                        select GetAction(contractDescription, operationDescription.Name)
                       ).ToArray();
    endpointDispatcher.ContractFilter = new ActionMessageFilter(actions);
}

Finally we need to add a new dispatch operation to the endpoint dispatcher so that it calls our PingOperation when the Ping action is received.

private void AddPingToDispatcher(EndpointDispatcher endpointDispatcher, ContractDescription contractDescription) {
    DispatchOperation pingDispatchOperation = new DispatchOperation(endpointDispatcher.DispatchRuntime,
        PingOperationName,
        GetAction(contractDescription, PingOperationName),
        GetAction(contractDescription, PingResponse));

    pingDispatchOperation.Invoker = new PingInvoker();
    endpointDispatcher.DispatchRuntime.Operations.Add(pingDispatchOperation);
}

private string GetAction(ContractDescription contractDescription, string name) {
    string @namespace = contractDescription.Namespace;
    if(!@namespace.EndsWith("/")) { @namespace = @namespace + "/"; }
    string action = string.Format("{0}{1}/{2}", @namespace, contractDescription.Name, name);
    return action;
}

Well, we are now done on the server side. We’ve created a couple of new classes:
• PingEndpointBehavior
• PingOperationBehavior
• PingInvoker

These three classes allow us to add a Ping method to a service by adding the Ping behavior via the service configuration file.

To test this, you can use the WcfTestClient application. The sample code demonstrates this by calling Ping on a standard WCF and WF service created by Visual Studio, see my DropBox.

In the next post I’ll discuss how we create a generic service proxy to call Ping.

UPDATE: the code works for the basicHttpBinding but not for wsHttpBinding.

UPDATE: Code now available from github.com/stefsewell/WCFPing

Securing WF & WCF Services using Windows Authentication

To finish off the DEV404 session Pete and I presented at TechEd NZ, I gave a brief run through of the steps required to get Windows Authentication working in a load balanced environment using kerberos. Given the number of camera phones that appeared for snaps I’m going to assume this is a common problem with a non-intuitive solution…

The product I work on is an on-premise enterprise solution that uses the Windows Identity to provide an authenticated credential against which to authorize user requests. We host our services in IIS/Windows Server AppFabric and take advantage of the Windows Authentication provided by IIS. This allows one of two protocols to be used: kerberos and NTLM, which have quite separate characteristics.

Why Use Kerberos?
There are two main reasons we want to use kerberos over NTLM:

1. Performance: NTLM uses a challenge response pattern for authentication which leads to a high network utilization. During performance testing we saw a high volume of NTLM challenges which ultimately throttled our ability to serve requests. Kerberos uses tickets which can be cached permitted a better performing protocol.

1. Double hops: NTLM does not flow credentials – the canonical example is a user requesting serviceA on server1 to access a secured resource on server2. Server1 cannot flow the users identity to server2.

Kerberos and Load Balancing
We want to run our services within a load balanced cluster to avoid single points of failure and to be able to grow resources to meet demand as required, without having to adopt bigger tin. The default configuration of IIS does not encourage this… the Application Pools run as a local machine account. This is a significant issue for Kerberos because of the manner in which the protocol encrypts the tickets passed between client, TGS and target server. The password of the account running the service is used to encrypt tickets so that only a process running under that account can decrypt the message. The default use of a machine specific account prevents a ticket granting access to serviceX on server A also being used to access serviceX on server B.

The following steps are required to fix this:

1. Use a common domain account for the applications pools.

We use a DOMAIN\service.expert account to run our services. This domain account is granted log on as a service and log on as a batch job rights on each of the application servers.

2. Register an SPN mapping the service class to the account.

We run our services on HTTP and so register the load balancer address with the domain account used to run the services:

>setspn -a HTTP/clusteraddress serviceAccount

We are using the WCF BasicHttpBinding which does not require the client to ensure the service is running as a particular user (to prevent man in the middle attacks). If you are using any other type of binding then the client needs to state who it expects the service to be running as.

3. Configure IIS to use the application pool account rather than a machine account

system.webServer/security/authentication/windowsAuthentication useAppPoolCredentials must be set to true.

4. Configure IIS to allow kerberos authentication tokens to be cached

system.webServer/security/authentication/windowsAuthentication authPersistNonNTLM must be set to true.

See also http://support.microsoft.com/kb/954873

5. Ensure the cluster address is considered to be in the Local Intranet zone


Kerberos tokens are not supported in the Internet zone, therefore the URL for your services must be considered to be trusted. The standard way to implement this is to roll out a group policy that adds your domain to the local intranet zone settings.

The slide deck for the talk is available from http://public.me.com/stefsewell/

DEV404 – Hardcore Workflow 4

Thanks to everyone who attended the DEV404 session at TechEd NZ. We wanted to cover off some new material that we haven’t seen else where and so Pete concentrated on the extensibility of the WorkflowServiceHost and the WorkflowServiceHostFactory. Before we got there I felt we needed a lead in and so I gave a brief overview of the workflow runtime, much of the material was covered in depth at PDC09 in the session Workflow 4 Inside Out.

The key point was the single threaded nature of the workflow scheduler. There is a single thread responsible for scheduling the execution of the activities in the activity tree, you really do not want to block this thread. This is the thread that runs the Execute method of synchronous activities, to show this in action I built the following workflow:

There’s a collection of strings populated with URLs of a few well known websites.

Then, there is a ParallelForEach that iterates over the collection and fetches the contents of the web page. The FetchUrl activity was written as follows:

using System.Activities;
using System.IO;
using System.Net;

namespace WorkflowRuntime.Activities {
    /// <summary>
    /// Fetch HTTP resource synchronously 
    /// </summary>
    public sealed class FetchUrlSync: CodeActivity {
        public InArgument Address { get; set; }
        protected override string Execute(CodeActivityContext context) {
            string address = context.GetValue(Address);
            string content = string.Empty;
            WebRequest request = HttpWebRequest.Create(address); 

            using(HttpWebResponse response = request.GetResponse() as HttpWebResponse) {
                if(response != null) {
                    using (Stream stream = response.GetResponseStream()) {
                        if (stream != null) {
                            StreamReader reader = new StreamReader(stream);
                            content = reader.ReadToEnd();
                        }
                    }
                }
            }
            return content;
        }
    }
}

The HttpWebRequest class is used to fetch the page contents. Running the workflow gives the following results:

The Urls are fetched one at a time, the same behavior that you would see if the activities were scheduled in a sequence rather than in a parallel. Why? This is the single threaded scheduler, it must wait for the Execute() method of the activity to complete before it can schedule the next activity.

What we want to see is:

So how can we achieve this? Well, we have to rewrite the FetchUrl activity to perform its work asynchronously. The HttpWebRequest already has async support via the BeginGetResponse and EndGetResponse method pairs; this is a standard pattern in .NET for async programming. The FetchUrl activity becomes:

using System;
using System.Activities;
using System.IO;
using System.Net;

namespace WorkflowRuntime.Activities {
    /// <summary>
    /// Fetch HTTP resource asynchronously
    /// <summary>
    public sealed class FetchUrlAsync: AsyncCodeActivity {
        public InArgument Address { get; set; }

        protected override IAsyncResult BeginExecute(AsyncCodeActivityContext context, AsyncCallback callback, object state) {
            string address = context.GetValue(Address);
            WebRequest request = HttpWebRequest.Create(address);
            context.UserState = request;
            return request.BeginGetResponse(callback, state);
        }

        protected override string EndExecute(AsyncCodeActivityContext context, IAsyncResult result) {
            string content = string.Empty; WebRequest request = (WebRequest) context.UserState;
            using (HttpWebResponse response = request.EndGetResponse(result) as HttpWebResponse) {
                if (response != null) {
                    using (Stream stream = response.GetResponseStream()) {
                        if (stream != null) {
                            StreamReader reader = new StreamReader(stream);
                            content = reader.ReadToEnd();
                        }
                    }
                }
            }
            return content;
        }
    }
}

We call the BeginGetResponse method passing in the callback and state object given to us by the workflow runtime as part of the AsyncCodeActivity.BeginExecute method. When the fetch is completed, by a separate worker thread, the workflow runtime is called back and the EndExecute method is invoked. In this method we take the resultant stream and read the contents into a string that we return. The workflow scheduler thread is no longer responsible for fetching the content, therefore it can schedule the fetch of the next Url and we get the parallel behavior we expect. All fetches are scheduled and then the workflow runtime waits to be called back by each worker thread when complete.

The time taken for the synchronous fetches to complete is the sum total of all fetches. For the asynchronous fetches, it is the time of the longest fetch plus a little overhead.

A basic rule of workflow is to perform I/O asynchronously and not to block the scheduler thread.

The sample code and PPT deck is available from https://public.me.com/stefsewell