PC 2020: My first self-build
June 22, 2020 3 Comments
Four-year cycles are common: leap year, the Olympics, various sporting world cups and as it turns out my personal computer refresh. This is the machine that I buy for me and it typically serves a number of needs: gaming, development, experiments, working from home, VR. The four-year cycle isn’t a planned refresh, it just so happens that when looking back I realized it’s been pretty consistent:
- 2002: Apple PowerBook G4 1.0 12”
- 2005: Dell 9100
- 2008: Macbook Pro 15
- 2012: Mac Pro (2010)
- 2016: Custom pre-built I5-6600K PC
- 2020: ?
There’s been a mix of Apple and PC hardware over the years, Intel-based Apple hardware has been used to run Windows via BootCamp as well as MacOS.
I have a confession, despite having been interested in computing from a young age I’ve never assembled a machine from scratch. Sure, I’ve upgraded machines and swapped out parts but never the whole shebang. Is 2020 the year to go full home build?
My current machine is good though unspectacular, built around an Intel i5 6600K. I bought this machine pre-built from PlayTech in January 2016 and it’s served as solid machine for both gaming and work. In the last four years the graphics card has been upgraded to a 1070 GTX to better support an Oculus Rift and I’ve added more memory but that’s about it. I run a pair of Dell QHD monitors, and the 1070 was driving them pretty happily until I started the campaign in the latest Call of Duty. The game would freeze and stutter at times despite running the recommended settings. That’s not enough of a reason to splurge a new PC, there were a number of other factors that came into play, so I started wondering what a refresh would look like…
When working, I might be running multiple instances of Visual Studio or I might be running virtual machines or standing up containers and so on. Virtual machines in particular like to have dedicated memory, sufficient vCPUs and fast storage. When gaming, I typically play story-based AAA titles at QHD such as the Tomb Raider reboots, Assassins Creed or the Call of Duty campaigns – I don’t stream or join multi-player games and such.
First attempt to improve gaming was to upgrade the graphics card to a 2070 RTX Super. Various hardware sites recommended the 2070 Super for QHD so I followed along and resisted the temptation to go all out. This did improve things but I was still getting some stalling and the CPU was now the bottleneck.
Four years is a long time in technology, I don’t really keep pace with hardware improvements unless I need to so it was pretty surprising to see how far things have moved on since 2016 for mainstream computing. Over the last year or two, we finally seem to have gone beyond quad core CPUs for the masses and AMD are almost universally recommended. Sure, Intel may still be winning the highest single core frequency but I’d like a more balanced machine and the AMD chips make much more sense. To support running multiple VMs concurrently, the AMD Ryzen 9 3900X looks good which provides 12 physical cores and 24 virtual cores. This triples the number of physical cores compared to my I5 and runs them all at a higher clock frequency. The chip isn’t cheap but it is less expensive than Intel’s high-end I9s and offers more cores. The jump from the 3900X to the 3950X isn’t worth it for me: an additional 550NZD (44% price increase) for four more cores.
Note: I use Hyper-V to manage VMs in Windows and currently there isn’t support for nested virtualization on AMD processors. Fingers crossed, it’s coming real soon now: https://techcommunity.microsoft.com/t5/virtualization/amd-nested-virtualization-support/ba-p/1434841
New CPU typically needs a new motherboard: in this case an AM4 board. There are two components I’ll typically go higher end for: motherboard and power supply. The current availability of parts in New Zealand limited my options, the ASUS ROG Crosshair VIII Formula X570 is top of the list. This has features I’m pretty sure I’ll never use, such as a built-in water block for cooling the VRM but there’s lots of IO including two NICs, it’ll take 128GB RAM and it’s well made.
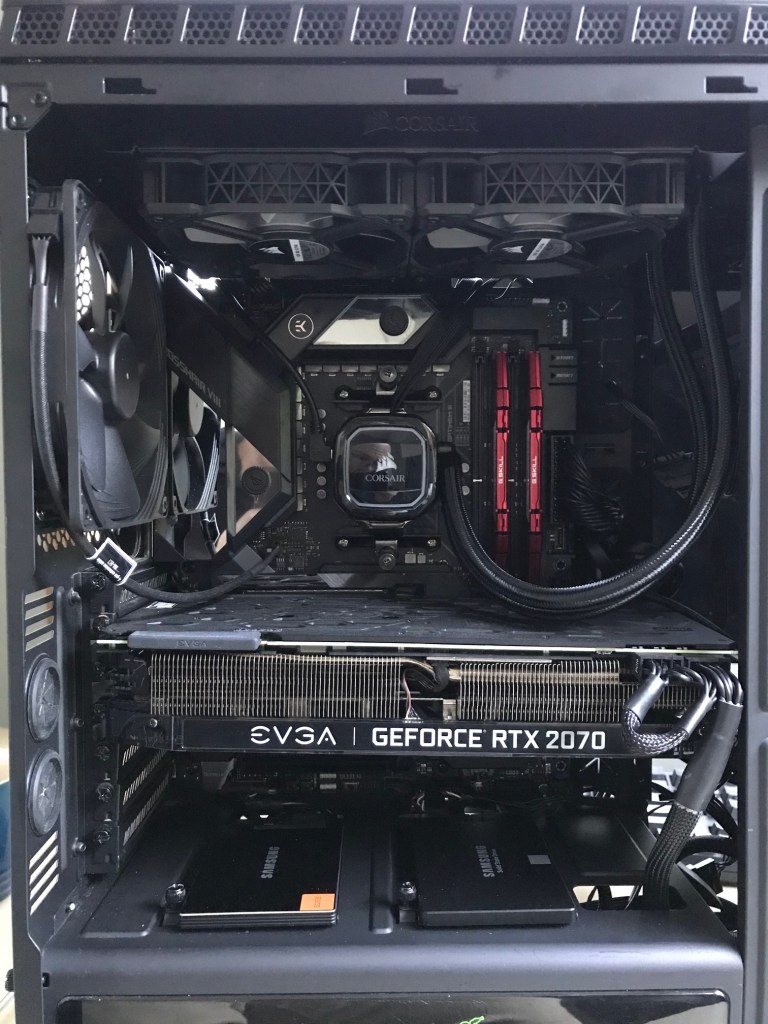
The original plan was to re-use all the other existing pieces I had: case, PSU, memory, storage, AIO CPU cooler so I bought the CPU and motherboard. My existing case is an NZXT 440 Razer edition, I didn’t particularly want the Razer edition case but it’s what came with the original pre-built machine. It has a set of green light strips and front case lighting for the Razer logo that I never switch on. I’d opened up the case a couple of times for adding RAM and drives and I don’t like it. My dislike is mostly down to the previous machine I had: a 2010 Mac Pro. The ‘cheese grater’ case was so easy to work in, the quality was superb. [I would still run that machine if the motherboard hadn’t crapped out and Apples repair quote wasn’t so ridiculous – a $4000 machine, the quote for repairing it was $6500! ] The NZXT case feels cheap in comparison, that said the case is easy to work with and allows tidy cable management.
Swapping out the motherboard and CPU pretty much qualifies as a PC build, doesn’t it? All that was left in the case was the PSU and storage drives so it’s pretty close to a new build. I was hoping to reuse the Corsair H80i cooler but unfortunately, I didn’t have an AM4 mounting and no one in New Zealand seemed to stock the required bracket. The Ryzen 9 comes with a reasonable air cooler in the box so installed it. The installation went pretty smoothly, thanks to a number of youtube videos; the ASUS motherboard was well documented and the various connections clearly marked. With everything plugged in, I switched it on and experienced the euphoria of the machine booting first time. I was impressed with Windows, my existing install, it booted up first time and everything was there: 24 logical processors, memory, all drives. The memory was running at 2133 rather than 2666 so into the BIOS to set the XMP profile to 2666. This done, reboot and all is well.
I left the machine running overnight, it was happy come morning and so things were looking good. The Windows installation still had the drivers and utilities for the previous motherboard so they were removed and the equivalent ASUS utilities installed: Armoury Crate and AI Suite 3. Armoury Crate took care of determining and installing the necessary ASUS drivers, AI Suite provided tuning apps for fans and overclocking. Running the overclocking detection offered a 2% improvement which I passed on, leaving the settings as stock. The fan configuration started a long journey into figuring out how to set-up cooling. The case had 3x 120mm fans in the front drawing in air and a 140mm fan in the top also drawing in air. The H80i cooler had been configured as the rear fan so I moved the top 140mm fan to the rear to push air out the back. The CPU temperature was around 45C when relatively idle, climbing to 70C+ when under sustained load. The machine was noisy…
The NZXT case has a fan module which allow multiple fans to be powered and the cables tidily routed. However, the module uses 3 pin connectors and is not plugged into a fan header on the motherboard, rather taking power from a SATA power connector so the fans were running at full tilt. Moving the fans to a case fan header on the motherboard allowed the fan tuning software to calm the fans down.
Next came the whining noise, particularly when the system booted from cold. The noise was coming from one of the 120mm fans, which on inspection were pretty dirty after 4 years use. I cleaned out all the fans but the noise remained. When turning the fan by hand I could feel resistance in one of the units compared to the others so I decided to swap out the fans with some new Noctua case fans. These came with rubber mountings to help manage vibrations and with 4 pin connections for better fan control. With these in place the machine was quieter but still not quiet.
I could have, and perhaps should have, stopped here. The machine was running and stable, benchmarks were impressive, gaming was smooth and stutter free. After about a week, I added a Corsair H100i all-in-one water cooler. Following Corsairs recommendations, the radiator was installed in the top of the case with air being pulled into the case and then exhausted out of the back. This was my first time installing a water cooler myself and I got there in the end, they’re big, bulky and a pain to work with inside the case. Once installed, I booted the machine and it failed to POST: Error code 02 displayed on the little OLED screen on the motherboard. Frantic googling led to a page which suggested plugging in the HDMI cable to the graphics card, which I had forgotten to plug back in. Thank goodness this worked, the machine booted.
Looking at the temperatures in the Corsair iCue software, I could see the CPU temperature was now down to 32-36C when idle. Running the overclocking utility suggested running all twelve cores at 4.25 GHz which was an 11% improvement. This matched the overclock I previously had on the i5 6600K. Some googling later, I found various references stating that the 3900X doesn’t overclock very well and to be wary of the voltage needed to drive the CPU. With the VCPU at 1.29V, it was well below the 1.35V threshold mentioned in some posts and videos. I’m sure more maybe possible if I knew what I was doing, but I don’t really and this seems good enough. Temperature on the CPU rose to 36-40C and stayed there.
Ok, done. The new machine scores 7287 in CineBench R20 compared to the 1654 of the 2016 build I5 – that’s a lot of extra horsepower. Again, this would have been a really good point to stop.
But I now had an Intel I5, a Z170 motherboard and a Corsair AIO cooler left over. The kids have a 2nd hand HP EliteDesk G1 which they use for gaming and school work. It would be fun to give them an upgrade too…
This meant getting a new case and PSU. There isn’t a lot of space for a PC case where the kids machine sits so, I kept the NZXT440 and instead got a new, smallish Corsair ATX case for the kids, a 275Q. I did upgrade the PSU in my machine to a Corsair HX850 and put the existing PSU into the new case for the kids. The kid’s PC already had an SSD boot drive and a GeForce GTX 1650 graphics card so they were transferred over. I also added a couple of fans taken from the NZXT case. This was finally a complete PC build from parts which took around 3 hours, the last half hour was trying to figure out why I couldn’t install the USB cable into the CPU cooler pump. The thumbscrew for the CPU mount covered the USB socket and so the cable couldn’t fit – but how did it work before? After lots of head scratching, I remember that I had taken the Intel bracket off the pump and then re-installed it. When I did so, I managed to change the orientation of the four mounting holes which meant the USB socket was spoiling with the mounting screw. After a couple of attempts I finally managed to get the bracket on correctly and all was well.
The new Kids PC needed DDR4 RAM rather than the DDR3 from the HP so I took two sticks from my PC and popped them in. It booted, Windows was happy with the new hardware and so Gigabyte drivers and utilities were installed for the motherboard. With fan tuning done via the tuning app, I’m now calling the upgrade done.
PC2020
| CPU | AMD Ryzen 9 3900X OC@4.25GHz |
| Motherboard | ASUS ROG Crosshair VIII Formula X570 |
| CPU Cooler | Corsair iCue H100i RGB PRO XT |
| RAM | GSkill RipJaws V 2666 (16GB x2) |
| Graphics Card | EVGA GeForce RTX 2070 Super FTW3 Ultra RGB |
| Storage | Samsung 970 EVO 500GB (boot) Samsung 850 EVO 500GB Samsung 830 500GB Intel 730 480GB |
| PSU | Corsair HX850 |
| Case | NZXT 440 Razer Edition |
Kids PC2020
| CPU | Intel i5 6600K OC@4.2GHz |
| Motherboard | Gigabyte Z170 Gaming 3 |
| CPU Cooler | Corsair H80i GT |
| RAM | GSkill RipJaws V 2666 (16GB x2) |
| Graphics Card | Gigabyte GeForce GTX 1650 |
| Storage | Samsung 860 EVO 1TB |
| PSU | FSP Aurum 650W Gold |
| Case | Corsair 275Q |
Benchmark for PC2020
Standard Settings

Overclocked
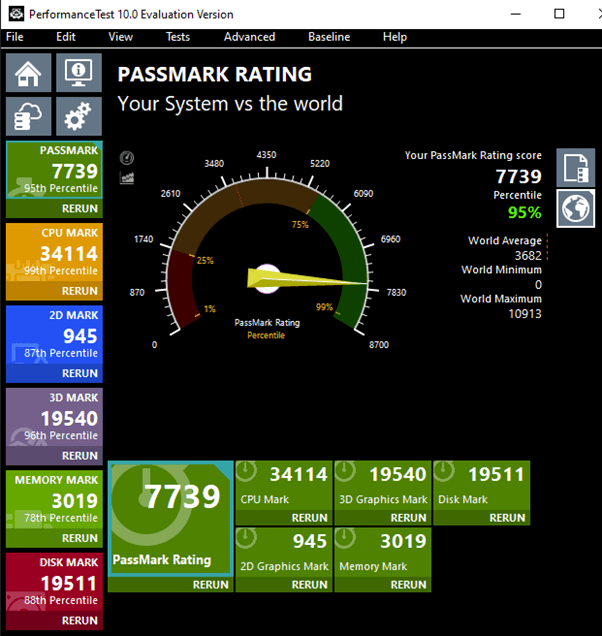
The drop in memory performance with the OC settings is odd. I might look at getting some faster RAM in the future, the motherboard will support 128GB so I’ll go 2x 32GB modules to enable maxing out the memory further down the road.
